


The idea of installing wallpaper was always quite intimidating to me. But peel and stick wallpaper has changed the game. It’s nothing like the traditional wallpaper our grandparents once used. This type of wallpaper is incredibly easy to install, and you don’t need a lot of supplies or experience to do it. While it’s not as simple as peeling and sticking to a wall, you can get it right with a few simple techniques.
Whether you want to add a pop of color, create an accent wall, or give a room a new look, peel-and-stick wallpaper is versatile and DIY-friendly. That said, I will walk you through the process of installing peel-and-stick wallpaper, including tips and tricks, mistakes to avoid, and some of the challenges with installation.

This post may contain affiliate links, which means I will earn a small commission if you purchase through my link. Please see the full disclosure and privacy policy for more information.
Why use wallpaper?
Peel and stick wallpaper offers several advantages compared to traditional wallpaper, making it a popular choice among DIY enthusiasts and interior designers. With a wide array of beautiful patterns, colors, and textures available, it enables you to infuse your space with a unique and personalized aesthetic. Wallpaper can add texture and depth to a room that paint alone cannot achieve, making for a visually interesting space.
With wallpaper, you can instantly breathe new life into a room, setting the desired mood or style while allowing for creative design throughout your home. Whether you’re working on a spacious living room, dining room, or cozy bedroom, peel and stick wallpaper has the transformative power to turn an ordinary space into something extraordinary.
What sets removable wallpaper apart is its remarkable versatility. It adheres easily to virtually any smooth, flat surface, including walls, doors, furniture, entryways, kitchen and bathroom cabinets, and much more. This flexibility makes it an ideal choice for those seeking a hassle-free and creative way to enhance their living spaces.
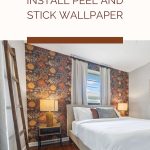
Bedroom Before Wallpaper Installation
Here’s a look at the bedroom before I applied the wallpaper. As you can see, it was a wall painted in a basic gray color. The wallpaper would add depth and visual interest to this wall.

Supplies You’ll Need
- Peel and stick wallpaper – I used five rolls of wallpaper measuring 17.7in x 9.8ft each.
- Wallpaper smoother
- Utility knife
- Scissors
- Step ladder
- Level
- Tape measure
- Pencil
DIY Wallpaper Installation
Step 1 – Measure the wall
It is important that you measure the dimensions of your wall to determine how much wallpaper you’ll need.
Use a tape measure to measure the height of the wall from the baseboard to the ceiling. Add a few extra inches to allow for trimming and mistakes.
Measure the width of the wall from corner to corner. Again, add a few extra inches to ensure you have enough wallpaper to cover the entire wall.
Step 2 – Prep the walls
You must prep the walls before installing the first strip of wallpaper. Prep the wall by removing any dirt, dust, or grease. You can use a mild detergent like dawn dish soap, warm water, or a cloth to wipe down the walls. Give the walls time to dry before applying the wallpaper.
Remove switch plates and outlet covers to ensure a clean and seamless installation.
Step 3 – Apply the first layer of wallpaper
Start from the left side of your wall, beginning at the top of the wall, and peel off a small portion of the backing- about 12 inches. Align the top edge of the wallpaper with the ceiling or any guidelines you’ve pre-marked on the wall. The first peel is the most important.
As you peel off the backing, use a squeegee or smoothing tool to smooth out any air bubbles or wrinkles. Work from the top down, gently pressing the wallpaper against the wall as you go.
Continue applying the wallpaper by slowly peeling off the backing and applying the wallpaper to the wall, working your way from top to bottom and side to side. Take your time to ensure the wallpaper is straight and aligned and no bubbles are present. Try not to force, but instead let gravity assist you. Be careful not to pull or stretch the material, or the pattern will not align.

Step 4 – Trim excess wallpaper
Once the wallpaper is fully applied to the wall, use a straight edge, razor blade, or a sharp utility knife to trim any excess wallpaper along the baseboard. Make sure to give it a straight and clean cut. I cut it precisely along the baseboards in a straight line to give it a clean look.

Step 5 – Match patterns and repeat
When applying the next layer of wallpaper, line up the wallpaper’s pattern to ensure a seamless look. Our boho theme wallpaper had unique patterns with flowers, so we aligned the flowers to begin our starting point.
Once you line up the wallpaper’s pattern, overlap the second piece slightly with the first and run the smoothing tool along the seam to make it as flat as possible. Trim at the bottom as needed and repeat to cover the entire surface.

Step 6 – Dealing with corners, edges, windows and outlets
For Windows and Electrical Outlets – When you reach a window, door frame, light switches, and outlet, let the wallpaper overlap it. Once the piece is applied, trim and remove the excess with a utility knife. Smooth the paper against the wall around all sides of the electrical outlet or window. Don’t worry about rough edges around the hole; the outlet cover or switch plate will hide most imperfections.
For Corners Edges – For inside corners, carefully cut the wallpaper along the corner and overlap the two pieces slightly. Use a squeegee or smoothing tool to press the overlapped edges together. For outside corners, make a diagonal cut in the wallpaper at the corner and wrap each piece around the corner, overlapping slightly.


Pros and Cons of Using Peel and Stick Wallpaper
Pros
- Easy and mess-free installation: Unlike traditional wallpaper, Peel and Stick wallpaper doesn’t require any messy adhesive or water. With its self-adhesive backing, you simply peel off the backing and stick it to your prepared wall. It’s a hassle-free process that saves time and effort.
- No damage to walls: self-adhesive wallpaper is designed to be removable without leaving any residue or damaging the walls. This makes it perfect for renters or anyone who likes to change their decor frequently.
- Versatile design options: Peel and stick wallpaper comes in a wide range of colors, patterns, and textures, allowing you to find the perfect match for your style and taste. Whether you prefer bold and vibrant or subtle and understated, there’s a peel-and-stick wallpaper option for you.
- Cost-effective and affordable: Peel-and-stick wallpaper is often more affordable than traditional wallpaper, making it a budget-friendly choice for those looking to transform their space without breaking the bank.
- It is temporary and removable: If you’re looking for a change but don’t want a permanent commitment, then removable wallpaper works. Temporary wallpaper is ideal for renters or those who frequently change their decor.
- Hide Imperfections: Wallpaper can effectively conceal minor imperfections on walls, such as cracks or uneven surfaces, providing a smoother and more polished appearance.
- Easy Maintenance: Many modern wallpapers are easy to clean and maintain, making them suitable for homes with children or pets. Stains and marks can often be wiped away with a damp cloth.
- Personalization: With a wide variety of patterns and designs available, you can choose wallpaper that reflects your personality, interests, and style preferences. Custom wallpaper designs are also an option.
Cons
- Paper can stick to itself, causing a bit of a hassle.
- Wrinkles can be harder to smooth out, but not impossible.
- It is very difficult to move the wallpaper around once it is on the wall to reposition it.
Tips for Installing Wallpaper
To achieve the best possible results and make your peel-and-stick wallpaper installation a breeze, here are some additional tips and tricks:
1. Work in small sections: It’s easier to manage the wallpaper and ensure a smooth installation if you work in small sections at a time. This is especially important if your wallpaper has a very busy pattern. You want it to align as closely to the patterns as possible, so working in small sections is important to achieve this.
2. Use a level: To ensure your wallpaper is straight and aligned, use a level as you apply each section. This will help you make any necessary adjustments before moving on.
3. Smooth out air bubbles: If you notice any bubbles or wrinkles while applying the wallpaper, gently lift the affected area and use a squeegee or smoothing tool to smooth them out. Work from the center of the bubble or wrinkle towards the edges.
4. Overlap seams: If your wallpaper has a pattern or design with seams, overlap them slightly to create a seamless look. Don’t overlap too much, as this can create a visible line.
5. Take breaks if needed: Installing peel-and-stick wallpaper can be time-consuming, especially for larger walls. Make sure to take breaks to prevent fatigue and ensure a high-quality installation.
Is peel and stick wallpaper easy to install?
Yes, with the right techniques, you can easily install wallpaper following my step-by-step guide.
How do you prepare a wall for peel and stick wallpaper?
The best way to prepare the walls for peel-and-stick wallpaper is to remove any dirt, dust, or grease. You can use a mild detergent like dawn dish soap, warm water, or a cloth to wipe down the walls. Remove all switch plates and outlet covers.
Should peel and stick wallpaper overlap?
Yes, it should absolutely overlap. However, make sure it is a slight overlap so not to use up too much wallpaper. Overlapping is also necessary to hide any seams on the walls.
Why is my peel and stick wallpaper falling off?
This is likely due to it not being installed correctly.
Do you need to prime before peel and stick wallpaper?
No, since you aren’t painting the wall, no priming is necessary to install peel and stick wallpaper.
How long will peel and stick wallpaper last?
When applied correctly with attention to detail, peel-and-stick wallpaper can maintain its charm and functionality for a substantial period—usually around 5-10 years or even longer. However, it’s important to note that its lifespan significantly depends on the application process. If applied incorrectly or removed and reapplied multiple times, the wallpaper’s longevity may be notably reduced.
Ultimately, the lifespan of peel and stick wallpaper can vary from one installation to another. Choosing a reputable brand, following proper installation techniques, and maintaining the room’s conditions can contribute to a longer-lasting, more visually appealing wallpaper.
Conclusion
Peel and stick wallpaper offers a convenient and stylish alternative to traditional wallpaper, allowing you to easily change the look of your space without the hassle or commitment.
Remember to take your time, measure accurately, and pay attention to detail throughout the installation.
Other posts you might like:
- How to Make a DIY Wood Slat Wall
- How to Build a Fire Pit in Your Backyard
- How to Whitewash a Stone Fireplace
- DIY White Wash Brick Fireplace: The Pros and Cons
What do you think of this easy DIY project?
Please comment below to let me know what your thoughts. Follow me on my social media pages – Pinterest and Instagram or subscribe to my mailing list for other design inspiration, DIY projects, and home decor ideas.
Tamara White is the creator and founder of The Thrifty Apartment, a home decor and DIY blog that focuses on affordable and budget-friendly home decorating ideas and projects. Tamara documents her home improvement journey, love of thrifting, tips for space optimization, and creating beautiful spaces.
- Tamara White
- Tamara White
- Tamara White
- Tamara White
- Tamara White
- Tamara White
- Tamara White
- Tamara White
- Tamara White
- Tamara White
- Tamara White
- Tamara White
- Tamara White
- Tamara White
- Tamara White
- Tamara White
- Tamara White
- Tamara White
- Tamara White
- Tamara White
- Tamara White
- Tamara White
- Tamara White
- Tamara White
- Tamara White
- Tamara White
- Tamara White
- Tamara White
- Tamara White
- Tamara White
- Tamara White
- Tamara White
- Tamara White
- Tamara White
- Tamara White
- Tamara White
- Tamara White
- Tamara White
- Tamara White
- Tamara White
- Tamara White
- Tamara White
- Tamara White
- Tamara White
- Tamara White
- Tamara White
- Tamara White
- Tamara White
- Tamara White
- Tamara White
- Tamara White
- Tamara White
- Tamara White
- Tamara White
- Tamara White
- Tamara White
- Tamara White
- Tamara White
- Tamara White
- Tamara White
- Tamara White
- Tamara White
- Tamara White
- Tamara White
- Tamara White
- Tamara White
- Tamara White
- Tamara White
- Tamara White
- Tamara White
- Tamara White
- Tamara White
- Tamara White
- Tamara White
- Tamara White
- Tamara White
- Tamara White
- Tamara White
- Tamara White
- Tamara White
- Tamara White
- Tamara White
- Tamara White
- Tamara White
- Tamara White
- Tamara White
- Tamara White
- Tamara White
- Tamara White
- Tamara White
- Tamara White
- Tamara White
- Tamara White
- Tamara White
- Tamara White
- Tamara White
- Tamara White
- Tamara White
- Tamara White
- Tamara White
- Tamara White
- Tamara White
- Tamara White
- Tamara White
- Tamara White
- Tamara White
- Tamara White
- Tamara White
- Tamara White
- Tamara White
- Tamara White
- Tamara White
- Tamara White
- Tamara White
- Tamara White
- Tamara White
- Tamara White
- Tamara White
- Tamara White
- Tamara White
- Tamara White
- Tamara White
- Tamara White
- Tamara White
- Tamara White
- Tamara White
- Tamara White
- Tamara White
- Tamara White
- Tamara White
- Tamara White
- Tamara White
- Tamara White
- Tamara White
- Tamara White
- Tamara White
- Tamara White
- Tamara White
- Tamara White
- Tamara White
- Tamara White
- Tamara White
- Tamara White
- Tamara White
- Tamara White
- Tamara White
- Tamara White
- Tamara White
- Tamara White
- Tamara White
- Tamara White
- Tamara White
- Tamara White
- Tamara White
- Tamara White
- Tamara White
- Tamara White
- Tamara White
- Tamara White
- Tamara White
- Tamara White
- Tamara White
- Tamara White
- Tamara White
- Tamara White
- Tamara White
- Tamara White
- Tamara White
- Tamara White
- Tamara White
- Tamara White
- Tamara White
- Tamara White
- Tamara White
- Tamara White
- Tamara White
- Tamara White
- Tamara White
- Tamara White
- Tamara White
- Tamara White
- Tamara White
- Tamara White
- Tamara White
- Tamara White
- Tamara White
- Tamara White
- Tamara White
- Tamara White
- Tamara White
- Tamara White
- Tamara White
- Tamara White
- Tamara White
- Tamara White
- Tamara White
- Tamara White
- Tamara White
- Tamara White
- Tamara White
- Tamara White
- Tamara White
- Tamara White
- Tamara White
- Tamara White
- Tamara White
- Tamara White
- Tamara White
- Tamara White
- Tamara White
- Tamara White
- Tamara White
- Tamara White
- Tamara White
- Tamara White
- Tamara White
- Tamara White
- Tamara White
- Tamara White
- Tamara White
- Tamara White
- Tamara White
- Tamara White
- Tamara White
- Tamara White
- Tamara White
- Tamara White
- Tamara White
- Tamara White
- Tamara White
- Tamara White
- Tamara White
- Tamara White
- Tamara White
- Tamara White
- Tamara White
- Tamara White
- Tamara White
- Tamara White


Your instructions are very helpful especially regarding the little bit of overlapping. I never would have thought of that.
Now if peel and stick paper wasn’t so pricey!
.
Your tips on preparing and applying peel-and-stick wallpaper are extremely helpful, especially for beginners like me. It’s great to see you sharing your own experiences and helping to avoid potential pitfalls.
you are welcome and thank you.