


I have wanted to build a fire pit in my backyard for quite some time, but finding the right time has proved challenging. A fire pit can be a nice focal point in a backyard, creating a cozy atmosphere and a gathering space.
It’s a simple yet attractive addition that can be enjoyed on different occasions, whether it’s a pleasant spring day or a chilly fall night. It’s a great way to make memories with family and friends, whether roasting marshmallows, having conversations, or enjoying the warmth.
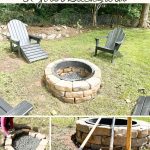
I finally decided to give it a shot, and I’ll be honest, it was easier than I thought – once I had all the materials ready. The trickiest part was digging the hole. If you’ve been considering adding a fire pit to your yard, I can walk you through how I did it, including the mistakes I learned from. So, if you’re up for it, grab your tools, and let’s get started.

DIY Fire Pit
Supplies Needed
- Fire Pit Ring – I went with a large steel fire pit ring as I wanted to have a fire pit that could accommodate multiple seats. The overall diameter is 34.25″, and the inner diameter is 30.11″. This fire ring is made of 100% steel.
- Retaining Wall Blocks (48)
- Paver Leveling Sand (2 bags)
- Drainage Rock (3 bags)
- Masonry Adhesive (2 tubes)
- Caulking Gun
- Shovel
- Metal Rake
- Gloves
- Tampers
- Rubber Mallet
- Measuring Tape

Step 1 – Choose a location in your backyard
When picking out the right spot for your fire pit, ensure it’s not under any trees or structures that could easily catch fire. Also, consider how close it is to your house and other outdoor hangout spots.
Consider the size of the fire pit in relation to your yard. If you plan to host large gatherings or prefer a more intimate setup, the size of the fire pit will be a consideration. I went for a larger fire pit as I wanted the option to accommodate large groups.
Step 2 – Outline the fire pit.
Outline the fire pit by placing the blocks and fire pit ring in a sample arrangement. You can mark the outline using a shovel or spray paint. This outline will help guide you as you dig. Once you’ve established the size of the fire pit outline, you can proceed to the next step.
Step 3 – Dig a hole
Dig an 8-inch hole, ensuring it is level and has a slight slope for proper drainage. Remove any tree roots that might be present in the hole. Use the tamper to help level the soil.


Step 4 – Pour the sand
Add a layer of sand to create a stable base for the fire pit. As you can see, the rain began to fall as soon as I started pouring the sand, but I was still able to proceed despite the wet sand.

Step 5 – Add the drainage rocks
Add a layer of drainage rocks to create a stable base for the fire pit. I used two bags of drainage rock here. Use the rake to evenly distribute the rocks and follow up with a tamper to level the drainage rocks.
Step 6 – Lay the first round of blocks
Begin placing your wall stones into the hole. Arrange the blocks or stones in a circular manner, ensuring they’re snug and level. Double-check the alignment from side to side and front to back.
If you’ve maintained accuracy throughout, the circle’s end should align with the starting grade of the first block. If needed, you can even out the stones using a rubber mallet. In my case, I started with 12 blocks for the initial round, and I made several adjustments as the blocks were not aligned properly.

Step 7 – Add masonry adhesive to the blocks
Use a masonry adhesive on top of the first round of blocks to prepare for the second round of blocks.
I’d recommend layering all your blocks first and placing the fire pit inside to ensure it fits properly before securing them with adhesive. Once you add the adhesive, it is final, and you cannot make adjustments.
Step 8 – Continue laying blocks.
Continue layering your blocks. Make sure you stagger the blocks. I positioned four levels of blocks for a total of 48 blocks, as I wanted a certain height for my fire pit.
Step 9 – Position the fire pit ring.
The final step is to position your fire ring. This will finish off your fire pit. To round out the look of the fire pit, I incorporated painted Adirondack chairs. This helped to elevate the look of the backyard fire pit.


Other posts you might like:
- 24 Fun Backyard Entertainment Ideas Everyone Will Love
- 28 Budget-Friendly Front Yard Ideas for Stunning Curb Appeal
I hope you enjoyed this quick tutorial. Please comment below to let me know what you think of this article. Follow me on my social media pages – Pinterest and Instagram or subscribe to my mailing list for other design inspiration, DIY projects, and home decor ideas.
Tamara White is the creator and founder of The Thrifty Apartment, a home decor and DIY blog that focuses on affordable and budget-friendly home decorating ideas and projects. Tamara documents her home improvement journey, love of thrifting, tips for space optimization, and creating beautiful spaces.
- Tamara White
- Tamara White
- Tamara White
- Tamara White
- Tamara White
- Tamara White
- Tamara White
- Tamara White
- Tamara White
- Tamara White
- Tamara White
- Tamara White
- Tamara White
- Tamara White
- Tamara White
- Tamara White
- Tamara White
- Tamara White
- Tamara White
- Tamara White
- Tamara White
- Tamara White
- Tamara White
- Tamara White
- Tamara White
- Tamara White
- Tamara White
- Tamara White
- Tamara White
- Tamara White
- Tamara White
- Tamara White
- Tamara White
- Tamara White
- Tamara White
- Tamara White
- Tamara White
- Tamara White
- Tamara White
- Tamara White
- Tamara White
- Tamara White
- Tamara White
- Tamara White
- Tamara White
- Tamara White
- Tamara White
- Tamara White
- Tamara White
- Tamara White
- Tamara White
- Tamara White
- Tamara White
- Tamara White
- Tamara White
- Tamara White
- Tamara White
- Tamara White
- Tamara White
- Tamara White
- Tamara White
- Tamara White
- Tamara White
- Tamara White
- Tamara White
- Tamara White
- Tamara White
- Tamara White
- Tamara White
- Tamara White
- Tamara White
- Tamara White
- Tamara White
- Tamara White
- Tamara White
- Tamara White
- Tamara White
- Tamara White
- Tamara White
- Tamara White
- Tamara White
- Tamara White
- Tamara White
- Tamara White
- Tamara White
- Tamara White
- Tamara White
- Tamara White
- Tamara White
- Tamara White
- Tamara White
- Tamara White
- Tamara White
- Tamara White
- Tamara White
- Tamara White
- Tamara White
- Tamara White
- Tamara White
- Tamara White
- Tamara White
- Tamara White
- Tamara White
- Tamara White
- Tamara White
- Tamara White
- Tamara White
- Tamara White
- Tamara White
- Tamara White
- Tamara White
- Tamara White
- Tamara White
- Tamara White
- Tamara White
- Tamara White
- Tamara White
- Tamara White
- Tamara White
- Tamara White
- Tamara White
- Tamara White
- Tamara White
- Tamara White
- Tamara White
- Tamara White
- Tamara White
- Tamara White
- Tamara White
- Tamara White
- Tamara White
- Tamara White
- Tamara White
- Tamara White
- Tamara White
- Tamara White
- Tamara White
- Tamara White
- Tamara White
- Tamara White
- Tamara White
- Tamara White
- Tamara White
- Tamara White
- Tamara White
- Tamara White
- Tamara White
- Tamara White
- Tamara White
- Tamara White
- Tamara White
- Tamara White
- Tamara White
- Tamara White
- Tamara White
- Tamara White
- Tamara White
- Tamara White
- Tamara White
- Tamara White
- Tamara White
- Tamara White
- Tamara White
- Tamara White
- Tamara White
- Tamara White
- Tamara White
- Tamara White
- Tamara White
- Tamara White
- Tamara White
- Tamara White
- Tamara White
- Tamara White
- Tamara White
- Tamara White
- Tamara White
- Tamara White
- Tamara White
- Tamara White
- Tamara White
- Tamara White
- Tamara White
- Tamara White
- Tamara White
- Tamara White
- Tamara White
- Tamara White
- Tamara White
- Tamara White
- Tamara White
- Tamara White
- Tamara White
- Tamara White
- Tamara White
- Tamara White
- Tamara White
- Tamara White
- Tamara White
- Tamara White
- Tamara White
- Tamara White
- Tamara White
- Tamara White
- Tamara White
- Tamara White
- Tamara White
- Tamara White
- Tamara White
- Tamara White
- Tamara White
- Tamara White
- Tamara White
- Tamara White
- Tamara White
- Tamara White
- Tamara White
- Tamara White
- Tamara White
- Tamara White
- Tamara White
- Tamara White
- Tamara White
- Tamara White
- Tamara White
- Tamara White
- Tamara White
- Tamara White
- Tamara White
- Tamara White
- Tamara White
- Tamara White
- Tamara White
- Tamara White
- Tamara White
- Tamara White
- Tamara White
- Tamara White
- Tamara White


I love your firepit segment. I can’t wait to get started on making my own.
You have some wonderful ideas and ones that I am sure will save me quite a bit of cash. Thanks for your creativity and frugal ideas.