Arranging a gallery wall can seem like a difficult task, especially when hanging it on a staircase. But with a bit of planning and patience, you can create a beautiful and eye-catching feature that elevates the look of your home.
Whether you want to showcase family photos, artwork, or a mix of both, a gallery wall can add personality and style to your home. Get ready to transform your staircase into a work of art with a gallery wall!
This post may contain affiliate links, which means I will earn a small commission if you purchase through my link. Please see the full disclosure and privacy policy for more information.
Staircase Before Gallery Wall

Here’s a look at the wall along the staircase. My wall looked empty. It needed a creative boost. I decided to create something fun yet memorable to capture our family and travels. A gallery wall was the answer. Follow along as I show you how I revamped this basic wall.
Step-by-Step Guide on Arranging Gallery Wall
Supplies Needed
- A blank wall along a staircase
- Picture frames
- Artwork, photographs, mirrors, and/or quotes
- Clear tape
- Paper or Poster Board
- Scissors
- Pencil
- Picture hanging kit or Command Strips
- Hammer
- Measuring tape
Step 1 – Choose a Theme or Color Scheme.
Before you hang up your pieces, it’s important to choose a theme or color scheme for your gallery wall. Think about the color and shape of the frames you want to use. Consider the colors already present in your home and select complementary shades. This will help create a cohesive look and make it easier to select which pieces to include.

The pieces you include on your gallery wall can include paintings, photographs, vintage artwork, mirrors, posters, or any other type of wall decor that you want to showcase. You can mix and match the different pieces. Choose pieces that you love that reflect your personal style and pieces that complement each other.
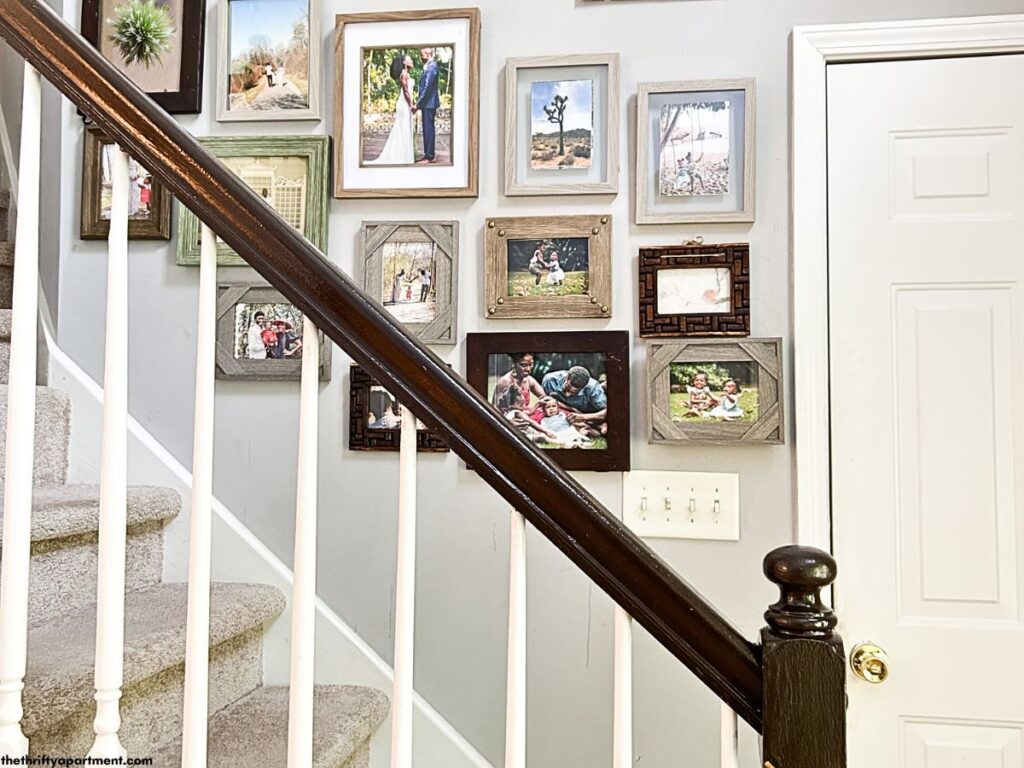
I opted for an array of brown grey and green-colored frames as this best matched the style and decor of my home. I also opted to incorporate personal photos of my family as well as photos of previous travels.
Don’t be afraid to experiment and try different combinations until you find the perfect mix.
Step 2 – Plan out Your Layout.
Once you have selected your pieces and have a theme or color scheme in mind, it’s time to plan your layout. There are many different ways to arrange a gallery wall, so choose a design that works well with the shape of your staircase and the size of your art pieces. You can choose a symmetrical layout or a more random arrangement, depending on your preference.
Step 3 – Trace Your Frames

Once you have chosen your layout, you can start to plan the positioning of your frames. Start by tracing the outlines of each of your frames with pencil on your choice of paper. This will help you visualize how the final arrangement will look and make it easier to plan where each piece will go.
I used old poster boards to outline my frames, but you can also substitute this type of paper with gift wrapping paper, newspaper, brown paper or printer paper. With this poster board, I was able to trace four different frames. My frame sizes ranged from 5×7, 8×10 and 11×14.

In addition, when outlining, I recommend using a pencil to mark where the nail or hook should be placed for each frame. This will make putting up your frame much easier.
Step 4 – Position the Paper Outlines

Create a mock-up of your layout on the wall using the cutouts. Start with the larger pieces and work your way out and around them. Use tape to attach the paper outlines to the wall in the arrangement you’ve chosen. This will allow you to experiment with different arrangements and see how the pieces will look together before committing to hanging them up.
Consider the size and shape of each piece, as well as the spacing between them. A general rule of thumb is to keep a consistent spacing of 2-3 inches between each piece. Use a measuring tape to measure the distance between each painting.
Take your time with this step, as it will make the installation process much easier. Also, this is where you will perfect your layout.
Once you have found the perfect layout, you can start hanging up your pieces!
Step 5 – Install the Hardware and Hang Frame
Use the template to mark where each nail or hook should be placed on the wall, and then install the hardware one frame at a time. Start with the largest pieces and then fill in the gaps with smaller ones.
Make sure to use the appropriate hardware for the weight of each piece. I used a picture hanging kit, which had varying sizes of hooks and nails to accommodate each frame. Use can also use command strips to hang your pieces.

Take time with this step, and use a leveler to ensure each piece is straight.
Step 6 – Step Back and Admire

Finally, step back and admire your staircase photo gallery! Your gallery wall should be a beautiful and eye-catching feature of your staircase.

Arranging a gallery wall along a staircase requires a bit of planning and patience, but the end result is well worth the effort. By following these simple steps, you can create a stunning gallery on your staircase that will enhance the look of your home.
Please let me know what you think about this gallery wall on the staircase. Feel free to follow me on my social media pages – Pinterest and Instagram or subscribe to my mailing list for other design inspiration, DIY projects, and home decor ideas.