This post may contain affiliate links.


Granite makes a wonderful addition to any home. Granite effortlessly blends practicality with stunning beauty, making it a popular high-end countertop material in many households. Granite’s appeal and durability can increase a home’s value and resale ability.
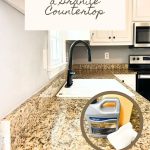
While granite can practically last forever, sealing your granite countertops is necessary for its upkeep and longevity. Granite needs to be sealed, or it will lose some of its fortitude and shine.
Thankfully it is easy to seal a granite countertop. Sealing granite protects the stone from tough stains, scratches, and bacteria that can build on the surface of your countertops. It also protects it from deteriorating over time.
So, whether you’re a first-time granite countertop owner or a seasoned pro looking to seal your granite countertop, get ready to protect your investment with this quick and easy guide to sealing your granite countertop.

Why seal a granite countertop?
Granite is porous, meaning it has tiny, open spaces on its surface that can be permeated. Its porous material makes granite susceptible to bacteria and stains.
Sealants help to infiltrate into the stone, creating a protective layer and barrier against bacteria and dirt.
Even if you recently had a granite countertop installed and sealed, sealants are known to wear down over time, allowing liquid and food residue to permeate the granite’s surface.
If you avoid sealing your granite countertop, it can become more vulnerable to damage, making it harder to clean and maintain.
Therefore, sealing your granite is a necessary part of its upkeep.
Step-by-Step Guide on How to Seal a Granite Countertop
Supplies you’ll need
- Granite Sealant – I used the Aqua Mix Sealer’s Choice Gold
- Microfiber cloth or rag
- Dish soap
- Gloves
- XL Cleaning Sponge

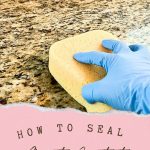
Step 1 – Clean the granite surface
The first step is to remove all items from the countertop to prepare for cleaning. Clean the granite countertop’s surface with a damp cloth and dish soap to wipe away any dirt, grease, and food residue on the countertop.
Once you are done, allow the entire counter to dry. The entire surface must be dry to apply the sealant in the next step.

Step 2 – Apply the sealant
Apply the sealant to the countertop.

Use an XL grouting sponge to apply it liberally and generously to the granite, letting it penetrate and absorb onto the surface. Apply the sealant with the sponge in a circular motion. Make sure the sealer is evenly distributed, covering the entire granite surface.

Then give the sealant 5 minutes to work its magic on the granite surface. If the sealer does not penetrate the surface within 5 minutes, use absorbent paper or a cotton towel to remove the excess sealer.
Please note that not all sealers are created the same. If you use a different sealer than the one recommended above, read the manufacturer’s label before applying the sealant. Your sealer of choice may require a different way of applying.
Step 3 – Apply a second coat of sealant (optional)
If a second coat is needed, allow 30 minutes of drying time between the first coat before applying the second coat.
Step 4 – Test the Surface
Allow the Sealant to dry for 2 hours after the final coat. Check to see if the surface is completely sealed by pouring water droplets on the surface. If the water gets absorbed, then you should apply another coat.
Step 5 – Let the Sealant dry
Allow the sealer to dry completely before using your granite kitchen countertops. Give it 4-6 hours before using the clean granite counters.

Tips When Using Granite Sealer
- Open the windows to allow air circulation and proper ventilation when applying sealer.
- Try to test the absorbency of the countertop before applying the seal. If your counters absorb oils or liquids, a sealer is necessary.
- Make sure that your granite countertops are clean and free from any stubborn stains or dirt before sealing.
- Do not apply the sealer too thickly; ensure it is distributed evenly on the granite surface.
- Give the sealer time to dry before using your countertops.
- Always choose a high-quality sealer that is specifically designed for granite countertops.
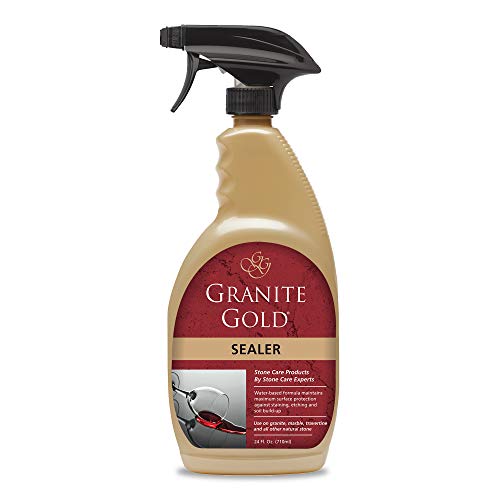
Best Sealer for Granite Countertops
There are a number of granite sealers available, making it a bit challenging to find the best sealer for a granite countertop. When looking for a sealer, you want to make sure that the sealer is durable, able to impregnate granite, and easy to apply and maintain.
Here are the best granite sealers on the market today.
Aqua Mix Sealer’s Choice Gold

Granite Gold Water-Based Sealer Spray
Miracle Sealants 511 PT SG Impregnator Sealer

Tips for maintaining sealed granite countertops
Sealing your granite countertops is part of their care and maintenance routine. Here are some tips for maintaining your sealed granite countertops:
- Be careful when using all purpose cleaning products or products with harsh chemicals. This can damage the granite and break down the sealant.
- Clean spills instantly to prevent them from staining the granite
- Use coasters and trivets. Protect your granite countertops from heat and scratches by using coasters and trivets.
- Avoid using abrasive pads and abrasive scrubbers. Abrasive cleaners can scratch the surface of the stone and damage the sealer.
- Use a granite cleaner to clean your countertops regularly. This will help to keep them looking their best and maintain their natural shine.
Is there a specific granite cleaner that I need to use once sealed?
If you don’t have a system to help you clean your granite countertops, you can simply clean your granite countertop with a damp rag and mild dish soap. Oftentimes, a damp rag will do. However, having a handy commercial cleaner helps preserve the granite countertop best. Here are a few cleaners that are great for everyday use.
- Granite Gold Daily Cleaner
- Black Diamond Stoneworks Granite Counter Cleaner
- Puracy Multi-Surface Cleaner Concentrate
- Method Daily Granite Cleaner
How often do you need to seal a granite countertop?
The frequency of sealing your granite countertops depends on several factors, such as the type of granite, how often you use the countertops, and the sealer you use. Generally, you should seal your granite countertops every one to three years.
Perform a granite water test every few months to see if your granite countertops need sealing. The simple water test requires you to leave a few drops of water on the countertop for 15 minutes. If the water beads up and doesn’t absorb into the stone, your granite countertops don’t need sealing. If a small amount of water starts to absorb into the stone, it’s time to seal your granite countertops.
Do granite countertops need to be sealed?
The short answer here is yes. A properly sealed countertop helps extend the granite’s life and protect it from stains and further damage.
What happens if you don’t seal granite countertops?
If you don’t seal your granite countertop, it could become exposed to stains and other damage. Granite is very porous and can absorb liquids and oils, often prevalent on a countertop. Sealing your granite countertop helps to protect it from damage and keeps it looking beautiful for years to come.
I hope you have found this tutorial helpful. Sealing your granite countertops is an essential part of its care routine. The sealer protects the stone from stains, scratches, and other forms of damage, making it last longer. By choosing the right sealer, preparing your countertops properly, and following the manufacturer’s instructions, you can ensure that your granite countertops are properly sealed and protected.
By following these tips, you can ensure that your sealed granite countertops last for years.

Posts you might like:
- How to Clean a Porcelain Kitchen Sink
- How To Clean a Glass Stove Top
- How To Clean Vinyl Plank Flooring
I hope you have found this article helpful. Please comment below to let me know what you think of this article. Feel free also to follow me on my social media pages – Pinterest and Instagram or subscribe to my mailing list for other design inspiration, DIY projects, and home decor ideas.
Tamara White is the creator and founder of The Thrifty Apartment, a home decor and DIY blog that focuses on affordable and budget-friendly home decorating ideas and projects. Tamara documents her home improvement journey, love of thrifting, tips for space optimization, and creating beautiful spaces.
- Tamara White
- Tamara White
- Tamara White
- Tamara White
- Tamara White
- Tamara White
- Tamara White
- Tamara White
- Tamara White
- Tamara White
- Tamara White
- Tamara White
- Tamara White
- Tamara White
- Tamara White
- Tamara White
- Tamara White
- Tamara White
- Tamara White
- Tamara White
- Tamara White
- Tamara White
- Tamara White
- Tamara White
- Tamara White
- Tamara White
- Tamara White
- Tamara White
- Tamara White
- Tamara White
- Tamara White
- Tamara White
- Tamara White
- Tamara White
- Tamara White
- Tamara White
- Tamara White
- Tamara White
- Tamara White
- Tamara White
- Tamara White
- Tamara White
- Tamara White
- Tamara White
- Tamara White
- Tamara White
- Tamara White
- Tamara White
- Tamara White
- Tamara White
- Tamara White
- Tamara White
- Tamara White
- Tamara White
- Tamara White
- Tamara White
- Tamara White
- Tamara White
- Tamara White
- Tamara White
- Tamara White
- Tamara White
- Tamara White
- Tamara White
- Tamara White
- Tamara White
- Tamara White
- Tamara White
- Tamara White
- Tamara White
- Tamara White
- Tamara White
- Tamara White
- Tamara White
- Tamara White
- Tamara White
- Tamara White
- Tamara White
- Tamara White
- Tamara White
- Tamara White
- Tamara White
- Tamara White
- Tamara White
- Tamara White
- Tamara White
- Tamara White
- Tamara White
- Tamara White
- Tamara White
- Tamara White
- Tamara White
- Tamara White
- Tamara White
- Tamara White
- Tamara White
- Tamara White
- Tamara White
- Tamara White
- Tamara White
- Tamara White
- Tamara White
- Tamara White
- Tamara White
- Tamara White
- Tamara White
- Tamara White
- Tamara White
- Tamara White
- Tamara White
- Tamara White
- Tamara White
- Tamara White
- Tamara White
- Tamara White
- Tamara White
- Tamara White
- Tamara White
- Tamara White
- Tamara White
- Tamara White
- Tamara White
- Tamara White
- Tamara White
- Tamara White
- Tamara White
- Tamara White
- Tamara White
- Tamara White
- Tamara White
- Tamara White
- Tamara White
- Tamara White
- Tamara White
- Tamara White
- Tamara White
- Tamara White
- Tamara White
- Tamara White
- Tamara White
- Tamara White
- Tamara White
- Tamara White
- Tamara White
- Tamara White
- Tamara White
- Tamara White
- Tamara White
- Tamara White
- Tamara White
- Tamara White
- Tamara White
- Tamara White
- Tamara White
- Tamara White
- Tamara White
- Tamara White
- Tamara White
- Tamara White
- Tamara White
- Tamara White
- Tamara White
- Tamara White
- Tamara White
- Tamara White
- Tamara White
- Tamara White
- Tamara White
- Tamara White
- Tamara White
- Tamara White
- Tamara White
- Tamara White
- Tamara White
- Tamara White
- Tamara White
- Tamara White
- Tamara White
- Tamara White
- Tamara White
- Tamara White
- Tamara White
- Tamara White
- Tamara White
- Tamara White
- Tamara White
- Tamara White
- Tamara White
- Tamara White
- Tamara White
- Tamara White
- Tamara White
- Tamara White
- Tamara White
- Tamara White
- Tamara White
- Tamara White
- Tamara White
- Tamara White
- Tamara White
- Tamara White
- Tamara White
- Tamara White
- Tamara White
- Tamara White
- Tamara White
- Tamara White
- Tamara White
- Tamara White
- Tamara White
- Tamara White
- Tamara White
- Tamara White
- Tamara White
- Tamara White
- Tamara White
- Tamara White
- Tamara White
- Tamara White
- Tamara White
- Tamara White
- Tamara White
- Tamara White
- Tamara White
- Tamara White
- Tamara White
- Tamara White
- Tamara White
- Tamara White
- Tamara White
- Tamara White


Excellent article on sealing granite counter tops! Thank you!!
Thank you. hope you found it helpful