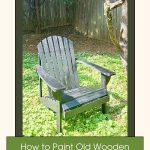

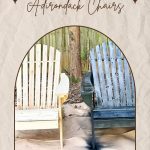

Adirondack chairs are widely popular and most notably known for their high backs and backward-sloping, reclining seats. Adirondack chairs embody comfort and relaxation in an outdoor space. With its unique blend of art and function, this outdoor staple makes the perfect addition to any backyard or fire pit.
But just like any piece of outdoor furniture, Adirondack chairs are susceptible to wear and tear by the sun, rain, wind, and extreme temperatures. This wear can cause the chair to fade and deteriorate over time.
Painting an Adirondack chair can be a great way to update and give this iconic furniture new life.
Follow along as I share how to best paint a wooden Adirondack chair using spray paint.

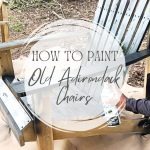
Adirondack Chair Before Painting
Here’s the wooden Adirondack chair before it was spray painted. I purchased these chairs unfinished from Home Depot two years ago while they were on sale. I intended to paint it, but time got away from me.
Two years later, the chair experienced some wear and tear from the weather changes. It had lots of dirt, mold, and mildew. It was time to give this chair the paint color I wanted.

You can purchase the same Hampton Bay Unfinished Stationary Wood Outdoor Adirondack Chair at Home Depot. However, some assembly is required.
Supplies & materials
- Spray Paint – I went with the Rust-Oleum Satin Canyon Black.
- Drop cloth or masking paper
- Clean cloth or sponge
- Orbital Sander
- Sandpaper
- Power washer (optional)
- Wood filler (optional)
- Deck screws (optional)
- Face Mask
- Safety goggles
- Disposable gloves
- Varathane Clear Semi-Gloss Oil-Based Spar Urethane Spray (optional)
Once you have all your supplies, you’re ready to get started!
Precaution – Make sure that you are in a well-ventilated area before starting this project.
Step-by-Step Guide on Spray Painting Adirondack Chairs
Step 1: Clean the chair
First, grab a bucket of warm water, soap, and a clean rag. Start by cleaning off any dirt and debris with a damp cloth. You can also power-wash it or hose it down to remove any dirt, mildew, or grime on the surfaces.

Ensure all the surfaces, including the sides, top, and back of the outdoor Adirondack chair, get cleaned. The soap will help remove grime and dirt on the wooden piece.

Give it some time to dry before moving to the next step.
Step 2: Prep the area
Place a cardboard, drop cloth, or masking paper beneath the Adirondack chair to protect the surrounding surfaces from the paint. I used an all-purpose masking paper to protect the ground.

Step 3: Inspect and repair the chair
Make sure to inspect the Adirondack chair thoroughly and look for any imperfections. You want to check for loose screws, loose boards, splinters, or deep gouges in the wood. If any of these are present, then repair is necessary.
This may require screws to be removed, replaced, or tightened, loose boards to be fastened, and areas of the wood to be filled in with wood fillers.
Once the repair is complete, ensure the Adirondack chair is dry and hardened before you move on to sanding.
Step 5: Sand the chair
As messy as sanding is, it is an important step in the painting process. The process involves sanding down the surfaces of the Adirondack chair to allow the paint to hold best to the chair’s surface. Sanding will help open up the wood’s pores, allowing the paint to penetrate most effectively.
For sanding, use medium-grit sandpaper to gently sand the surface. You can also use an orbital sander if you have one. Sand down any rough edges and imperfections. Smooth out any bumps or rough spots in the wood with the sandpaper.
Once you’ve sanded the chair, dust it off with a clean cloth or large sponge brush to remove any sanding dust or debris left behind.
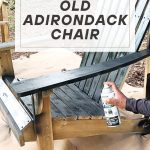
Step 6: Spray paint the chair
Shake your can of Ultra Cover 2X Gloss spray paint before use. You will hear the mixing ball rattle, loosening up the paint. Hold the can 10 inches away from the chair and spray in a steady sweeping motion.

Spray the paint from the top and work down in an up-and-down motion, applying a smooth and even coat. Take care to cover all surfaces, including edges, corners, and the chairs’ feet.


Allow the paint to dry. It will dry to the touch within an hour. Once the top coat dries, turn the Adirondack chair upside down to paint the bottom. Again, you want to get every nook and cranny of the entire chair.
* It is important to note that this brand of Rustoleum spray paint is a combination of paint and primer. You do not have to add extra primer to the chair before painting.
Step 7: Second coat of paint
Once the first coat of paint dries, add a second coat of spray paint.


Since one can of paint thoroughly coats the Adirondack chair on the first coat, you will need another can of spray paint to finish the job. I applied a second coat of paint, giving the chairs the desired finish.
Step 7: Let it Dry
Allow the paint to penetrate the wood and dry. The dry time may vary based on the specific spray paint you use and the weather conditions. I’d recommend giving it at least a day to dry. Try to avoid touching the chair until it is completely dry.


Step 8: Apply a Protective Coat (optional)
This step is optional but highly recommended to keep your chair outdoors in extreme weather.
After the paint has dried, apply a protective top coat of Clear, Semi-Gloss, Oil-Based Spar Urethane Spray. It is a clear coat of spray, so you won’t need to worry about it impacting the sprayed-on color of the paint. This spray varnish will protect the Adirondack chair from various weather conditions and resist graying and weathering. I
It will protect the wood from damage caused by exposure to sun, water, and temperature changes while allowing its natural beauty to shine through.
I love the finished look of these spray-painted Adirondack chairs. They look new and add so much beauty to my backyard. These classic chairs will last for many years to come.

Do you have to sand the Adirondack chair before painting?
It is always a good idea to sand the Adirondack chair before painting to allow the paint to adhere to the chair best. This will give you the best results with a longer-lasting impact.
What is the best paint for wooden Adirondack chairs?
The best spray paint for outdoor furniture is Rust-Oleum American Accents Spray Paint. This exterior paint is my go-to spray paint of choice. It is available in a variety of colors, including bright and darker colors.
The exact color I used to spray paint the Adirondack chair black is the Rust-Oleum Satin Canyon Black. I love Rustoleum’s entire paint brand, as their painting products are superior to most. They even have spray paint just for plastic outdoor furniture.

How many cans of spray paint are needed to paint an Adirondack chair?
One can of paint typically covers the whole chair. However, if you want fuller coverage, a second coat will require at least two spray paint cans to complete the project.
More DIY projects you might like:
- How to Paint an Old Wooden Bookshelf
- How to Paint a Nightstand That’s Laminate
- 15 Best Places to Sell Used Furniture Online
- How to Paint Front Door Without Removing it
I hope you have found this easy DIY project helpful. Please comment below to let me know what you think of this article. Feel free to follow me on my social media pages – Pinterest and Instagram or subscribe to my mailing list for other design inspiration, DIY projects, and home decor ideas.
Tamara White is the creator and founder of The Thrifty Apartment, a home decor and DIY blog that focuses on affordable and budget-friendly home decorating ideas and projects. Tamara documents her home improvement journey, love of thrifting, tips for space optimization, and creating beautiful spaces.
- Tamara White
- Tamara White
- Tamara White
- Tamara White
- Tamara White
- Tamara White
- Tamara White
- Tamara White
- Tamara White
- Tamara White
- Tamara White
- Tamara White
- Tamara White
- Tamara White
- Tamara White
- Tamara White
- Tamara White
- Tamara White
- Tamara White
- Tamara White
- Tamara White
- Tamara White
- Tamara White
- Tamara White
- Tamara White
- Tamara White
- Tamara White
- Tamara White
- Tamara White
- Tamara White
- Tamara White
- Tamara White
- Tamara White
- Tamara White
- Tamara White
- Tamara White
- Tamara White
- Tamara White
- Tamara White
- Tamara White
- Tamara White
- Tamara White
- Tamara White
- Tamara White
- Tamara White
- Tamara White
- Tamara White
- Tamara White
- Tamara White
- Tamara White
- Tamara White
- Tamara White
- Tamara White
- Tamara White
- Tamara White
- Tamara White
- Tamara White
- Tamara White
- Tamara White
- Tamara White
- Tamara White
- Tamara White
- Tamara White
- Tamara White
- Tamara White
- Tamara White
- Tamara White
- Tamara White
- Tamara White
- Tamara White
- Tamara White
- Tamara White
- Tamara White
- Tamara White
- Tamara White
- Tamara White
- Tamara White
- Tamara White
- Tamara White
- Tamara White
- Tamara White
- Tamara White
- Tamara White
- Tamara White
- Tamara White
- Tamara White
- Tamara White
- Tamara White
- Tamara White
- Tamara White
- Tamara White
- Tamara White
- Tamara White
- Tamara White
- Tamara White
- Tamara White
- Tamara White
- Tamara White
- Tamara White
- Tamara White
- Tamara White
- Tamara White
- Tamara White
- Tamara White
- Tamara White
- Tamara White
- Tamara White
- Tamara White
- Tamara White
- Tamara White
- Tamara White
- Tamara White
- Tamara White
- Tamara White
- Tamara White
- Tamara White
- Tamara White
- Tamara White
- Tamara White
- Tamara White
- Tamara White
- Tamara White
- Tamara White
- Tamara White
- Tamara White
- Tamara White
- Tamara White
- Tamara White
- Tamara White
- Tamara White
- Tamara White
- Tamara White
- Tamara White
- Tamara White
- Tamara White
- Tamara White
- Tamara White
- Tamara White
- Tamara White
- Tamara White
- Tamara White
- Tamara White
- Tamara White
- Tamara White
- Tamara White
- Tamara White
- Tamara White
- Tamara White
- Tamara White
- Tamara White
- Tamara White
- Tamara White
- Tamara White
- Tamara White
- Tamara White
- Tamara White
- Tamara White
- Tamara White
- Tamara White
- Tamara White
- Tamara White
- Tamara White
- Tamara White
- Tamara White
- Tamara White
- Tamara White
- Tamara White
- Tamara White
- Tamara White
- Tamara White
- Tamara White
- Tamara White
- Tamara White
- Tamara White
- Tamara White
- Tamara White
- Tamara White
- Tamara White
- Tamara White
- Tamara White
- Tamara White
- Tamara White
- Tamara White
- Tamara White
- Tamara White
- Tamara White
- Tamara White
- Tamara White
- Tamara White
- Tamara White
- Tamara White
- Tamara White
- Tamara White
- Tamara White
- Tamara White
- Tamara White
- Tamara White
- Tamara White
- Tamara White
- Tamara White
- Tamara White
- Tamara White
- Tamara White
- Tamara White
- Tamara White
- Tamara White
- Tamara White
- Tamara White
- Tamara White
- Tamara White
- Tamara White
- Tamara White
- Tamara White
- Tamara White
- Tamara White
- Tamara White
- Tamara White
- Tamara White
- Tamara White
- Tamara White
- Tamara White
- Tamara White
- Tamara White
- Tamara White
- Tamara White
- Tamara White
- Tamara White
- Tamara White
- Tamara White
- Tamara White
- Tamara White
- Tamara White
- Tamara White
- Tamara White