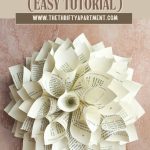
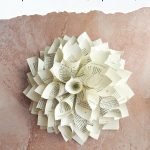


This DIY Paper Dahlia project is simple and fun to make. With just a few materials—cardboard, an old book, and some basic craft supplies—you can create a paper flower that works as home decor, a unique gift accent, or even wall art.
It’s also a great way to repurpose old books into something decorative and useful. Whether you’re looking for a weekend project or a creative way to recycle, this Paper Dahlia is an easy option to try.

Supplies

Instructions
Step 1: Cut a circle from cardboard with a diameter of 20 centimeters.

Step 2: Tear out pages from the book or magazine you have chosen to recycle. Cut squares from them approximately 8 x 8 centimeters.

Step 3: Roll each square into a cone shape and glue the edges.

Step 4: Once the cones are made, start gluing them onto the cardboard base. It’s important to start from the outside and work your way in, overlapping the cones as you get closer to the center.
Leave approximately 1.5 centimeters of space between each cone. Ensure all gaps are covered in the different layers to achieve a uniform look.

Step 5: For the final rows, you will need smaller cones to close the circle properly, approximately 6.5 x 6.5 centimeters. You can make even smaller ones for the very last part if desired.

And that is it. You will now have a beautiful paper dahlia craft.

This is such a fun craft to make with kids too.


DIY Cupcake Liner Flower
Instructions
- Cut a circle from cardboard with a diameter of 20 centimeters.
- Tear out pages from the book or magazine you have chosen to recycle. Cut squares from them approximately 8 x 8 centimeters.
- Roll each square into a cone shape and glue the edges.
- Once the cones are made, start gluing them onto the cardboard base. It’s important to start from the outside and work your way in, overlapping the cones as you get closer to the center.Leave approximately 1.5 centimeters of space between each cone. Ensure all gaps are covered in the different layers to achieve a uniform look.
- For the final rows, you will need smaller cones to close the circle properly, approximately 6.5 x 6.5 centimeters. You can make even smaller ones for the very last part if desired.