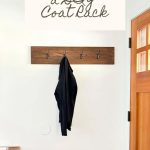

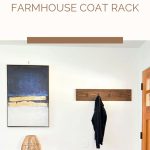
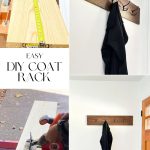

A coat rack is more than just a practical necessity—it’s a statement piece that adds warmth and character to any space. If you’ve ever walked into a room and wished for a convenient spot to hang your coat or scarf, then you’ll appreciate the versatility of a well-placed coat rack.
Whether your home is tight on closet space or you simply crave a touch of rustic charm in your entryway, a DIY farmhouse coat rack offers the perfect solution.
In this step-by-step guide, I’ll show you how to create your own farmhouse-inspired coat rack with just a few basic materials and some easy woodworking techniques. From selecting the perfect wood to assembling and mounting your rack, you’ll learn everything you need to know to bring this functional and stylish piece to life.

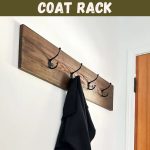
DIY Wall Mounted Coat Rack
Materials Needed
- Sanding Sponge or Sand Paper
- 1 in. x 8 in Pine Wood – It’s important to note that the actual dimensions of this wood (or any wood at the hardware store) will always be 1/2 inch smaller.
- Wall Hooks
- Wood Stain in Dark Walnut
- Paint Brush
- Short Screws
- Long 2-½” wood screws
- Rag or Piece of Cloth
- Pencil
- Plastic sheeting
- Drop cloth
Tools Required
- Circular Saw, Manual, or Power Saw
- Tape Measure
- Cordless Drill Set
- Stud Finder
- Saw Horses
- Level
Most of these materials, hand tools, and power tools can also be found at your home depot or local craft store. Since wood is the most vital part of the project, you can also substitute pine wood with a piece of scrap wood or barnwood to create this wooden DIY coat rack.
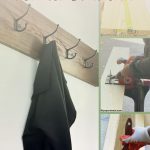
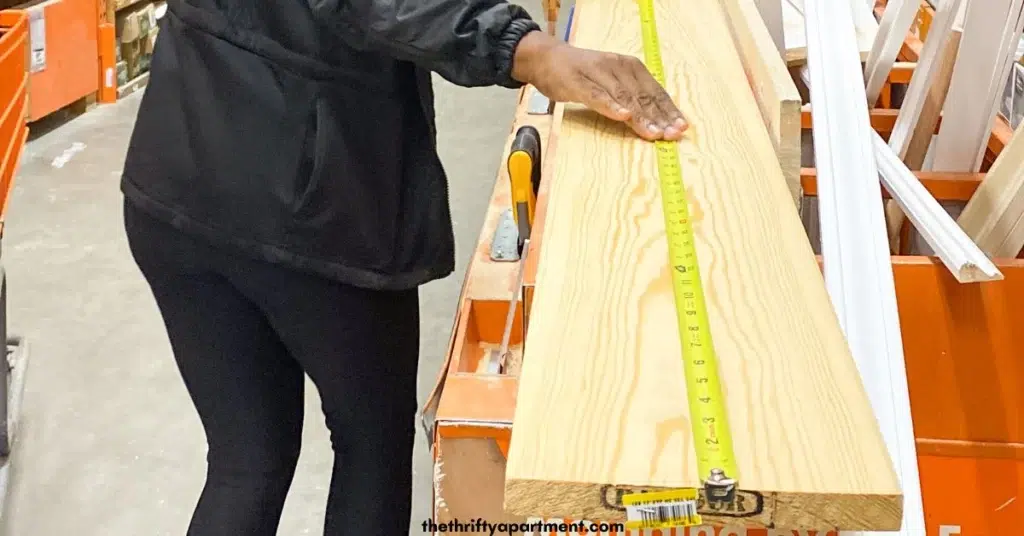
Step 1 – Measure your wood.
After choosing your preferred type of wood, the initial step is to measure its size using a measuring tape and mark the desired length with a pencil.
I aimed for a coat rack with four hooks spaced 7 inches apart from each other. This meant cutting the wood to a total length of 35 inches.
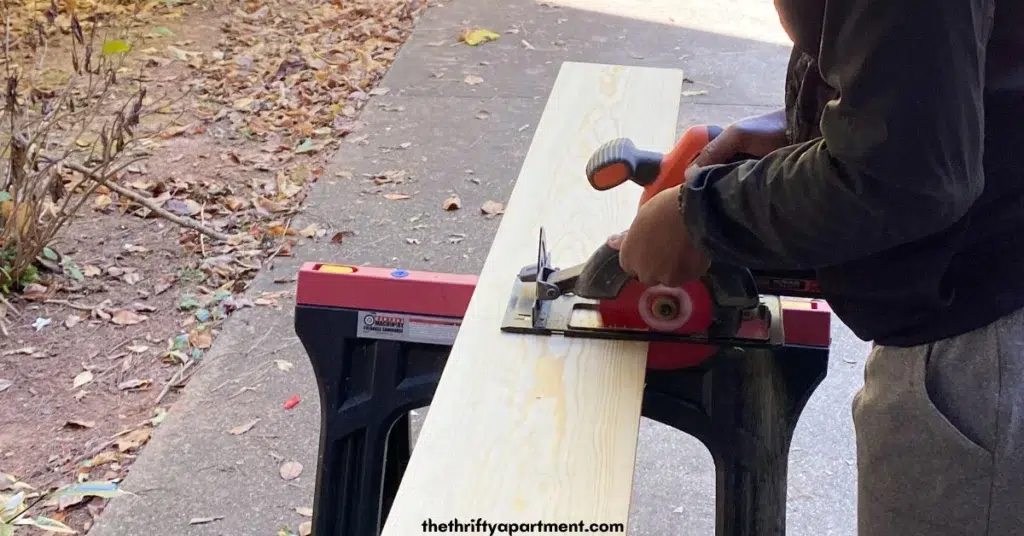
Step 2 – Cut the Wood
Next up is cutting the wood using a circular saw. To ensure stability and safety during cutting, I positioned the pine wood on saw horses to keep it secure and steady on the work surface. Then, I carefully used the saw blade to cut the wood to the desired length.
Step 3 – Sand the wood
With the wood now cut to size, the next step is sanding. Using either grit sandpaper or a sanding sponge, carefully sand the wood to smooth the surface and eliminate any rough edges, scratches, dings, or blemishes.
Effective sanding not only enhances the appearance of the wood but also prepares it for staining, bringing out its natural beauty. Additionally, the sanded surface allows the wood to absorb the stain more evenly.
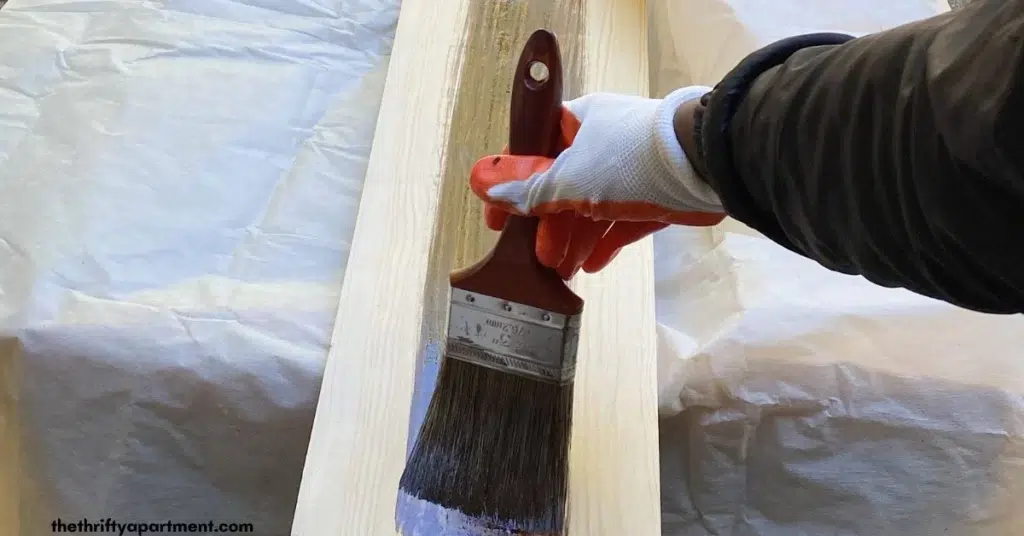
Step 4 – Stain the wood.
First, select your preferred stain color and give it a good stir before using it. Using a paintbrush, start applying the stain to the sanded wood surface. Be sure to use a rag to wipe away any drips or excess stain from the edges of the board.
Allow the first coat to dry completely—typically one coat is enough with this brand of stain. However, if you desire a darker or more uniform finish, feel free to apply a second coat. The final outcome will ultimately depend on your personal preference. Repeat the staining process on the other side of the wood and ensure each coat dries for at least 24 hours before proceeding to the next step.
Step 5 – Affix the Coat Hooks
With the staining process complete, it’s time to attach the hooks to the pine wood. Begin by using a measuring tape to position the hooks in a straight line, spaced 7 inches apart. Mark the position of each hook with a pencil to ensure accurate placement for drilling. Next, take each hook and angle the tips of the screws before using a cordless drill to securely fasten them into the wood.

A quick note: When I got ready to start drilling, I noticed that the screws provided with the hooks were too long for the wood. Fortunately, I had some spare screws from a previous project that were just the right length to fit through the hook and into the board.
Lesson learned—next time, I’ll make sure to measure all the materials and supplies, including the screws, before diving into the project. This way, I can avoid any unexpected surprises and ensure everything I need is on hand from the get-go.
Step 6 – Locate the Studs
With the hooks securely in place, it’s time to mount the coat hanger onto the wall. Begin by using a stud finder to locate the positions of the studs in the wall. Given that the coat hanger will be supporting heavy items, it’s advisable to aim for anchoring the wood to at least two wall studs for added stability and support.
Step 7 – Mount the Coat Rack
Once you’ve located the stud, grab a leveler to ensure the board is perfectly straight before securing it to the studs permanently. Once it’s aligned, drill a long finishing nail through the board, penetrating the wall and anchoring into the stud.
Quick tip: If you’re unable to attach the wooden coat rack directly to a stud, consider using wall anchors on the back of the wood instead. Opt for self-drilling drywall anchors for a simple and effective solution.

Please comment below to let me know what you think of this easy DIY project. Feel free also to follow me on my social media pages – Pinterest and Instagram or subscribe to my mailing list for other design inspiration, DIY projects, and home decor ideas.
Tamara White is the creator and founder of The Thrifty Apartment, a home decor and DIY blog that focuses on affordable and budget-friendly home decorating ideas and projects. Tamara documents her home improvement journey, love of thrifting, tips for space optimization, and creating beautiful spaces.
- Tamara White
- Tamara White
- Tamara White
- Tamara White
- Tamara White
- Tamara White
- Tamara White
- Tamara White
- Tamara White
- Tamara White
- Tamara White
- Tamara White
- Tamara White
- Tamara White
- Tamara White
- Tamara White
- Tamara White
- Tamara White
- Tamara White
- Tamara White
- Tamara White
- Tamara White
- Tamara White
- Tamara White
- Tamara White
- Tamara White
- Tamara White
- Tamara White
- Tamara White
- Tamara White
- Tamara White
- Tamara White
- Tamara White
- Tamara White
- Tamara White
- Tamara White
- Tamara White
- Tamara White
- Tamara White
- Tamara White
- Tamara White
- Tamara White
- Tamara White
- Tamara White
- Tamara White
- Tamara White
- Tamara White
- Tamara White
- Tamara White
- Tamara White
- Tamara White
- Tamara White
- Tamara White
- Tamara White
- Tamara White
- Tamara White
- Tamara White
- Tamara White
- Tamara White
- Tamara White
- Tamara White
- Tamara White
- Tamara White
- Tamara White
- Tamara White
- Tamara White
- Tamara White
- Tamara White
- Tamara White
- Tamara White
- Tamara White
- Tamara White
- Tamara White
- Tamara White
- Tamara White
- Tamara White
- Tamara White
- Tamara White
- Tamara White
- Tamara White
- Tamara White
- Tamara White
- Tamara White
- Tamara White
- Tamara White
- Tamara White
- Tamara White
- Tamara White
- Tamara White
- Tamara White
- Tamara White
- Tamara White
- Tamara White
- Tamara White
- Tamara White
- Tamara White
- Tamara White
- Tamara White
- Tamara White
- Tamara White
- Tamara White
- Tamara White
- Tamara White
- Tamara White
- Tamara White
- Tamara White
- Tamara White
- Tamara White
- Tamara White
- Tamara White
- Tamara White
- Tamara White
- Tamara White
- Tamara White
- Tamara White
- Tamara White
- Tamara White
- Tamara White
- Tamara White
- Tamara White
- Tamara White
- Tamara White
- Tamara White
- Tamara White
- Tamara White
- Tamara White
- Tamara White
- Tamara White
- Tamara White
- Tamara White
- Tamara White
- Tamara White
- Tamara White
- Tamara White
- Tamara White
- Tamara White
- Tamara White
- Tamara White
- Tamara White
- Tamara White
- Tamara White
- Tamara White
- Tamara White
- Tamara White
- Tamara White
- Tamara White
- Tamara White
- Tamara White
- Tamara White
- Tamara White
- Tamara White
- Tamara White
- Tamara White
- Tamara White
- Tamara White
- Tamara White
- Tamara White
- Tamara White
- Tamara White
- Tamara White
- Tamara White
- Tamara White
- Tamara White
- Tamara White
- Tamara White
- Tamara White
- Tamara White
- Tamara White
- Tamara White
- Tamara White
- Tamara White
- Tamara White
- Tamara White
- Tamara White
- Tamara White
- Tamara White
- Tamara White
- Tamara White
- Tamara White
- Tamara White
- Tamara White
- Tamara White
- Tamara White
- Tamara White
- Tamara White
- Tamara White
- Tamara White
- Tamara White
- Tamara White
- Tamara White
- Tamara White
- Tamara White
- Tamara White
- Tamara White
- Tamara White
- Tamara White
- Tamara White
- Tamara White
- Tamara White
- Tamara White
- Tamara White
- Tamara White
- Tamara White
- Tamara White
- Tamara White
- Tamara White
- Tamara White
- Tamara White
- Tamara White
- Tamara White
- Tamara White
- Tamara White
- Tamara White
- Tamara White
- Tamara White
- Tamara White
- Tamara White
- Tamara White
- Tamara White
- Tamara White
- Tamara White
- Tamara White
- Tamara White
- Tamara White
- Tamara White
- Tamara White
- Tamara White
- Tamara White
- Tamara White
- Tamara White
- Tamara White
- Tamara White
- Tamara White
- Tamara White
- Tamara White
- Tamara White
- Tamara White
- Tamara White
- Tamara White
- Tamara White
- Tamara White