This post may contain affiliate links.


I stumbled upon an old wooden bookshelf that I knew had the potential to be so much more. However, this bookshelf desperately needed an update and a modernized touch. Despite all the stains, grime, and scratches, the solid wood was still beautiful. I knew with a little bit of paint and some TLC, I could transform this bookcase into a usable and functional piece of furniture that would fit seamlessly into my home.
Painting an old bookshelf is a fantastic way to breathe new life into it. Rather than splurging on new pieces, refinishing a bookshelf with a fresh coat of paint is an economical and effortless way to save money and add a touch of personality to your home.
I want to share exactly how I transformed my old wooden bookshelf with paint. Follow along as I show you the tips and tricks I used to revamp my old bookshelf.
It’s time to give your old bookshelves the makeover it deserves!

Bookshelf Before Painting
Here’s a look at the bookshelf before it was painted. This bookshelf was a thrift store find that cost $5.
Discovering this old bookshelf was exciting, and I knew it had untapped potential waiting to be revealed. A much-needed update and a modern touch were essential to revive this neglected piece. There’s a certain satisfaction in discovering a solid wood piece of furniture and granting it a second chance at life.
Beneath its weathered surface and worn exterior was a hidden beauty waiting to be revealed. Despite the layers of grime and scratches, the solid wood had a charm that spoke to me, and with a little bit of paint and TLC, I was determined to transform this bookshelf into something special.

What you’ll need
Supplies & Materials
- Rust-Oleum Oil Based Primer
- Paint – I used the Spectral Indigo color of latex paint from Sherwin Williams.
- Paintbrush
- Foam Paint Roller
- Hammer
- Screwdriver
- Paint stirrer
- Paint tray
- Drop Cloth or Cardboard
- Sandpaper or Optical Sander
- Dish Soap or Murphy Oil Soap Wood Cleaner
- Microfiber cloth or rag
- Wood Filler (optional)
- Putty Knife (optional)
- Peel and Stick Wallpaper (optional)
- Foam Board (optional)
- Staple Gun (optional)
These supplies can be purchased online or at Lowes or Home Depot. Once you have all your supplies, you’re ready to get started!
Painting Bookshelves
Step 1 – Clean the Wooden Bookshelf
The first step in preparing the bookshelf for painting is to clean up the bookshelf by wiping it down with a damp rag.
If it’s really dirty, add some dawn soap to some warm water to create soapy water and use it to wipe down the bookshelf. This should remove any dirt and dust from the bookshelf. Wipe down thoroughly. When done, take a dry cloth and wipe off any leftover water and wetness remaining from cleaning.


Step 2: Inspect and repair the bookshelf
Make sure to inspect the bookshelf thoroughly and seek out any imperfections. You want to check for loose screws, loose boards, splinters, or deep gouges in the wood. If any of these are present, then repair is necessary.
This may require screws to be removed, replaced, or tightened, loose boards to be fastened, and pieces of wood to be filled in with wood fillers.


On this bookshelf, several nails were sticking out of the wood. I removed some screws and hammered in ones that were coming loose.
In addition, one of the legs of the bookshelves was rotted and weathered. I used a circular saw to cut off the rotted areas. I then cut off a portion of the opposite leg to even out the legs. Thankfully it was just enough to allow the bookcase to continue standing on its own.


Step 3 – Prep the work area
Place the drop cloths or masking paper beneath the bookshelf to protect the surrounding surfaces from the paint. Painting can get quite messy and difficult to remove from surfaces. I used protective paper to cover the ground. You can also substitute with drop cloth, rosin paper, cardboard or newspaper.
Step 4 – Sand the bookshelves
As messy as sanding is, it is an important step in the painting process. The process involves sanding down the surfaces of the bookshelf to get rid of some of the old finish. Although it produces a lot of dust, sanding allows the primer and paint to hold best to its surface.
For sanding, use medium grit sandpaper to sand the surface gently. You can also use an orbital sander if you have one in your arsenal. I used an orbital sander which made the process quicker.
Sand the bookshelves until smooth and free of any bumps or imperfections. This step ensures that the paint adheres well to the surface.

Step 5 – Apply Primer
Apply a thin layer of primer to the bookshelves using the paint foam roller or paintbrush. Make sure to cover all surfaces evenly and let the primer dry. With this primer, only one coat is necessary.

When priming, I used a step ladder to reach the upper shelves of the bookcase and other hard-to-reach places.

Step 6 – Paint the Bookshelves
Now it’s time to start painting the bookshelves! Stir the paint using a paint stick. Pour the portion of the paint that you will need to add the first coat into the paint tray.

Use the foam roller to begin painting the bookshelf. Make sure to go back and use a small paintbrush to get the creases and crevices of the bookshelf that the roller can’t reach.
Then let it dry for an hour.


Step 7 – Apply a second coat of paint
After the first coat of paint has dried, it’s time to add a second coat. This will ensure that the bookshelves are evenly coated, making for the best paint finish.

Step 8 – Allow the Paint to Dry
Make sure to let the paint dry completely between coats for best results.
This paint dries to the touch within an hour. However, I’d recommend giving it at least 24-48 hours before placing anything on the bookshelves for even better results. This will ensure that the paint is fully dry and nothing accidentally scratches the surface.
Optional Step 9 – Add Wallpaper
Since my bookcase did not have a “back,” I created one using foam board and wallpaper. I started by measuring the length of the bookshelf to see how much foam board and wallpaper were needed. I cut three pieces of foam board to the size of the bookshelf and connected them.
Related post: How to Cover Wire Shelving | DIY Foam Board Hack
I then applied the peel-and-stick wallpaper to the foam board and finalized the look by stapling the DIY back to the bookcase with a staple gun.


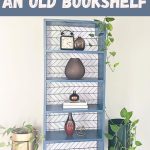
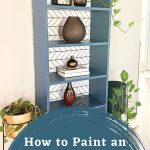
And there you have it—a brand new-looking bookshelf. The bookshelf now has a clean, modern look.
It will make a great addition to any space, including a kid’s bedroom, living room, home office, or dining room.
Bookcase Painting Tips
Use a foam roller – Although you can use a paintbrush, I’d recommend using a foam roller. The foam roller allows you to cover more surfaces, resulting in a nice smooth finish. It also helps to speed up the painting time. However, a paintbrush is still needed to get into the smaller nooks and crannies of the bookshelf.
Choose a high-quality paint – One of the biggest mistakes you can make is using low-quality paint. The quality of paint can make or break the look and longevity of your bookshelf. You want to use paint that won’t peel off or fade over time.
Use a Primer – It may be tempting to skip steps. However, it is best to use a primer before painting your bookshelf. The primer allows the paint to cling effectively to the bookshelves.
How to Choose the Right Paint
Choosing the right paint color for your bookshelf is vital to achieving the desired look. When selecting paint, choose a high-quality product suitable for wood surfaces. You want to use paint that will hold up over time, not strip, and goes on smoothly.
The best type of paint for painting furniture is either latex paint, chalk paint, or mineral paint. These types of paints are durable, easy to clean, and come in a wide range of colors. For latex paint, go for a gloss or semi-gloss finish. This will give your piece a polished look that is easy to clean and wipeable. Chalk paint is also an excellent option for furniture painting as it needs very little prep work, is easy to use, and finishes smoothly.
How to Choose the Right Paint Color
Consider the room’s color scheme and the bookshelf’s location when selecting colors. For example, a bright, bold color will make a statement in a neutral room, while a muted color will blend seamlessly. I opted for a beautiful blue color to give my living area a pop of color.
You can also color-match the furniture before painting. I like to use Samplize, a peel-and-stick paint sample company that delivers samples made with paint from Benjamin Moore, Sherwin-Williams, PPG, and Farrow & Ball. Samplize is a no-mess and environmentally friendly way to sample paint. It will help you pick paint better! They have over 8k unique paint colors to choose from. If you like to color in a pillow, blanket, rug, or wallpaper, you can take that color out and have it color-matched.
How long does it take to paint a bookshelf?
The time it takes to paint a bookshelf depends on the size and complexity of the bookshelf. This bookshelf took a few hours in between paintings.
Can I paint a bookshelf without sanding it first?
While it’s possible to paint a bookshelf without sanding it first, it’s not recommended. Sanding the surface will ensure that the paint adheres evenly and smoothly.
How do you fill in cracks and chips on the furniture?
Wood filler or putty is an excellent way to fill in cracks and chips on any piece of wood furniture. Apply the filler with a putty knife, filling the crack and holes. Allow the filler to dry completely before sanding and painting.
What are the benefits of painting furniture?
Painting furniture is a great way to give old furniture new life and new purpose. It is a way to add value to an old piece of furniture and create a higher-quality product.
Almost any old furniture can be repurposed with a creative eye and a little paint. It’s a great alternative to buying expensive furniture.
If nothing else, it is a great way to positively impact the environment by helping to reduce waste.
So what do you think of this bookshelf makeover? Leave a note below with your thoughts or comments about the new side table.
More posts you might like:
- Ways to Style a Bookshelf
- How to Paint a Nightstand that’s Laminate
- How to Clean Wood Furniture
- How to Paint a Vase with Acrylic Paint to Look Expensive
- How to DIY a Farmhouse Rustic Coat Rack
- How to Upcycle a Vintage Suitcase into a Nightstand
Feel free to follow me on my social media pages – Pinterest and Instagram or subscribe to my mailing list for other design inspiration and home decor idea.
Tamara White is the creator and founder of The Thrifty Apartment, a home decor and DIY blog that focuses on affordable and budget-friendly home decorating ideas and projects. Tamara documents her home improvement journey, love of thrifting, tips for space optimization, and creating beautiful spaces.
- Tamara White
- Tamara White
- Tamara White
- Tamara White
- Tamara White
- Tamara White
- Tamara White
- Tamara White
- Tamara White
- Tamara White
- Tamara White
- Tamara White
- Tamara White
- Tamara White
- Tamara White
- Tamara White
- Tamara White
- Tamara White
- Tamara White
- Tamara White
- Tamara White
- Tamara White
- Tamara White
- Tamara White
- Tamara White
- Tamara White
- Tamara White
- Tamara White
- Tamara White
- Tamara White
- Tamara White
- Tamara White
- Tamara White
- Tamara White
- Tamara White
- Tamara White
- Tamara White
- Tamara White
- Tamara White
- Tamara White
- Tamara White
- Tamara White
- Tamara White
- Tamara White
- Tamara White
- Tamara White
- Tamara White
- Tamara White
- Tamara White
- Tamara White
- Tamara White
- Tamara White
- Tamara White
- Tamara White
- Tamara White
- Tamara White
- Tamara White
- Tamara White
- Tamara White
- Tamara White
- Tamara White
- Tamara White
- Tamara White
- Tamara White
- Tamara White
- Tamara White
- Tamara White
- Tamara White
- Tamara White
- Tamara White
- Tamara White
- Tamara White
- Tamara White
- Tamara White
- Tamara White
- Tamara White
- Tamara White
- Tamara White
- Tamara White
- Tamara White
- Tamara White
- Tamara White
- Tamara White
- Tamara White
- Tamara White
- Tamara White
- Tamara White
- Tamara White
- Tamara White
- Tamara White
- Tamara White
- Tamara White
- Tamara White
- Tamara White
- Tamara White
- Tamara White
- Tamara White
- Tamara White
- Tamara White
- Tamara White
- Tamara White
- Tamara White
- Tamara White
- Tamara White
- Tamara White
- Tamara White
- Tamara White
- Tamara White
- Tamara White
- Tamara White
- Tamara White
- Tamara White
- Tamara White
- Tamara White
- Tamara White
- Tamara White
- Tamara White
- Tamara White
- Tamara White
- Tamara White
- Tamara White
- Tamara White
- Tamara White
- Tamara White
- Tamara White
- Tamara White
- Tamara White
- Tamara White
- Tamara White
- Tamara White
- Tamara White
- Tamara White
- Tamara White
- Tamara White
- Tamara White
- Tamara White
- Tamara White
- Tamara White
- Tamara White
- Tamara White
- Tamara White
- Tamara White
- Tamara White
- Tamara White
- Tamara White
- Tamara White
- Tamara White
- Tamara White
- Tamara White
- Tamara White
- Tamara White
- Tamara White
- Tamara White
- Tamara White
- Tamara White
- Tamara White
- Tamara White
- Tamara White
- Tamara White
- Tamara White
- Tamara White
- Tamara White
- Tamara White
- Tamara White
- Tamara White
- Tamara White
- Tamara White
- Tamara White
- Tamara White
- Tamara White
- Tamara White
- Tamara White
- Tamara White
- Tamara White
- Tamara White
- Tamara White
- Tamara White
- Tamara White
- Tamara White
- Tamara White
- Tamara White
- Tamara White
- Tamara White
- Tamara White
- Tamara White
- Tamara White
- Tamara White
- Tamara White
- Tamara White
- Tamara White
- Tamara White
- Tamara White
- Tamara White
- Tamara White
- Tamara White
- Tamara White
- Tamara White
- Tamara White
- Tamara White
- Tamara White
- Tamara White
- Tamara White
- Tamara White
- Tamara White
- Tamara White
- Tamara White
- Tamara White
- Tamara White
- Tamara White
- Tamara White
- Tamara White
- Tamara White
- Tamara White
- Tamara White
- Tamara White
- Tamara White
- Tamara White
- Tamara White
- Tamara White
- Tamara White
- Tamara White
- Tamara White
- Tamara White
- Tamara White
- Tamara White
- Tamara White
- Tamara White
- Tamara White
- Tamara White
- Tamara White
- Tamara White


Tamara you did a fantastic job! It looks so good & I love that you added the wallpaper background. This will be featured at tomorrow’s Home Imagined link party. Hope to see you there. X0- MaryJo
That’s such great news. thank you.
I love the new look! Beautiful!
Thank you so much.
Hi Tamara!
This is an amazing way to re-purpose a thrifted piece of furniture! I love the color you chose to paint it and the wallpaper in the back is such a lovely touch.
You did a great job!!!
Thank you Rachel!