This post may contain affiliate links.
A couple of years ago, we built an outdoor railing right off the front porch. The handrail not only served as a safety feature for our home but also contributed to the home’s overall aesthetics. However, the porch railing recently became weathered, showing great signs of wear and tear.
We decided to stain the wooden railing to update the weathered look, extend its lifespan, and improve the front yard’s aesthetic charm. In addition, staining the handrail would provide defense and protection against the natural outdoor elements since the railing had experienced a great deal of wear and tear from the rain, snow, and sun.
Follow along as I show you how to stain a wooden handrail with this easy step-by-step guide.

Why stain outdoor wood?
Staining wooden handrails protects them from the natural elements of the outdoors and further damage. These damages can include (but are not limited to) mold, rot, and water.
When staining a handrail, the rule of thumb is to stain the weathered wood every two to three years. If you notice wear and tear sooner, then the advice is to stain it once any damages and wear become noticeable.
How to Stain a Deck Railing
What you’ll need
Supplies and Materials
- Outdoor wood stain – I used the SuperDeck Exterior Wood Stain by Sherwin Williams.
- Drop cloth or masking paper
- Paint Roller
- Paintbrush
- Clean cloth or sponge
- Orbital Sander
- Sandpaper (medium and fine grit)
- Stir stick or paint mixer
- Putty knife (optional)
- Power washer (optional)
- Wood filler (optional)
- Deck screws (optional)
- Face Mask
- Safety goggles
- Disposable gloves
- Ladder
Safety Precautions
Before beginning, wear a mask and safety glasses when sanding the wooden rail. The dust from wood can become a potential health risk resulting in an allergic response or respiratory reaction when breathed in.
Step 1: Clean the Wood
Before you start staining, ensure the hand railing is clean and free from any dirt, dust, or old finish. Grab a bucket of water, soap, and a clean rag. Wipe down the entire handrail with soap and water.
You can also power wash it or hose it down to remove any dirt, mildew, or grime on the surfaces. Give it some time to dry before moving to the next step.
Step 2: Prep the Area
Start prepping the area around the handrail. Place a drop cloth or masking paper beneath the handrail to protect the surrounding surfaces from stain splatters or drips. I used an all-purpose masking paper to protect the floors.

Step 3: Inspect and repair the Rail
Make sure to inspect the wooden handrail thoroughly and seek out any imperfections. You want to check for loose screws, loose boards, splinters, or deep gouges in the wood. If any of these are present, then repair is necessary.
This may require screws to be removed, replaced, or tightened, loose boards to be fastened, and areas of the wood to be filled in with wood fillers.
Once the repair is complete, make sure the handrail is dry and hardened before you move on to sanding.
Step 4: Sand the Wood Rail
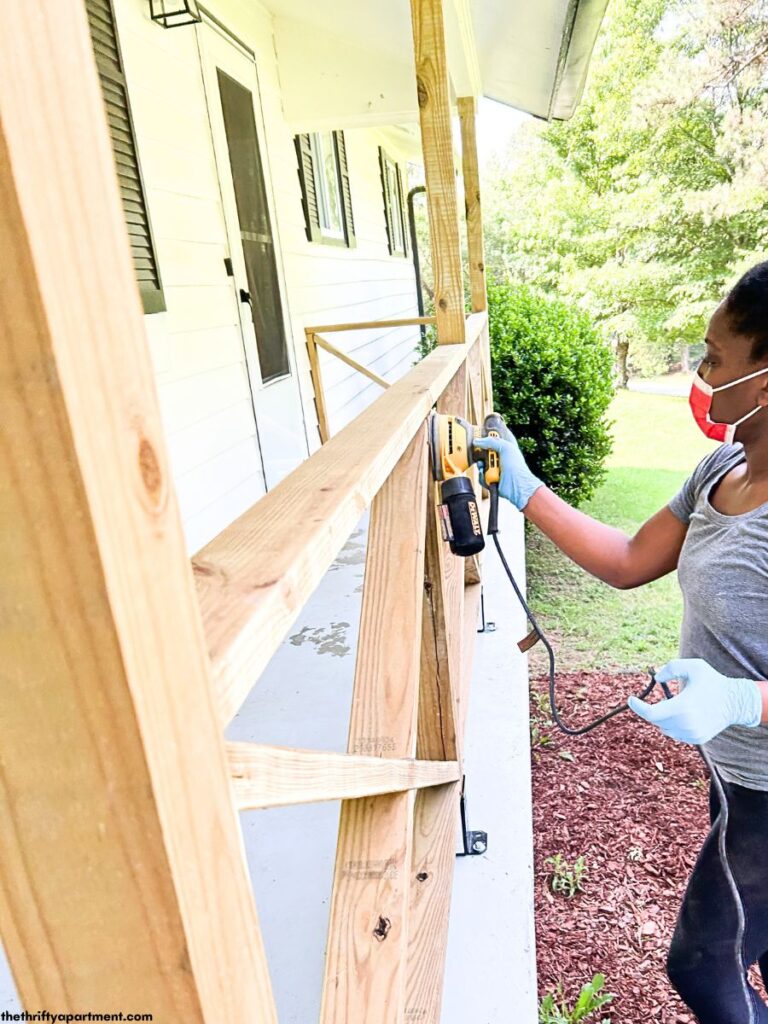
Attach the grit sandpaper to the orbital sander. Begin smoothing out the surfaces of the hand rail by sanding the wood with the orbital sander. Sanding will help to open up the wood’s pores, allowing the stain to penetrate most effectively.

Be sure to check the evenness of the handrail’s appearance sand. Some wood can get easily damaged if you push too hard with the sander.


For hard-to-reach areas and areas that the sander is not able to touch, use sanding paper and sand by hand to get into the tight nook and cranny of the handrails. You should also use a ladder to reach the top of the baluster.
Step 5: Dust off the Handrail
Once you finish sanding, wipe away any dust or debris with a clean cloth or large sponge brush.

Step 6: Stain the wood
Stir the stain thoroughly with a paint mixer before use. Use a roller or paintbrush and start applying the stain to the handrail. Begin from the top and work down to stain wood, applying a smooth and even coat. Take care to cover all surfaces, including edges and corners.


Use a clean cloth to remove excess stain or dripping from the handrail. This step helps prevent the formation of sticky or tacky spots and ensures an even appearance.
Step 7: Let it Dry
Allow the stain to penetrate the wood and dry. The dry time will vary based on the type of stain you use and the weather conditions. It is often recommended to give it at least a day or two to dry. Try to avoid touching the handrail until it is completely dry.


Step 8: Apply a Second Coat (Optional)
If you desire a deeper color or added protection, you can apply additional coats of stain. Thankfully the stain I used did not require two coats.
Do you have to sand the railing before staining?
The short answer is Yes. You must sand the wood before staining a handrail to allow the stain to adhere and stick best to the railing as well as provide even coverage. This will give you the best results and longer-lasting impact.
How often should you stain an outdoor railing?
The rule of thumb is to stain your outdoor wooden rail every 2-3 years. You can stain it under the two-year mark if you notice damages or wear and tear sooner.
What is the best wood stain for handrails?
The best wood stain for an outdoor wooden handrail is the SuperDeck Exterior Wood Stain by Sherwin Williams. This outdoor wood stain is easy to use and goes on wood very smoothly.

Should I paint or stain my railing?
When it comes to handrails, staining is often the preferred choice. Stain penetrates the wood and enhances its natural beauty while protecting the elements. Paint, on the other hand, can chip and peel over time, requiring more maintenance. However, paint may be the better option if you want a specific color or a more opaque finish.
Posts you may like:
I hope you have found this article helpful. Please comment below to let me know what you think of this article. Feel free to follow me on my social media pages – Pinterest and Instagram or subscribe to my mailing list for other design inspiration, DIY projects, and home decor ideas.
Tamara White is the creator and founder of The Thrifty Apartment, a home decor and DIY blog that focuses on affordable and budget-friendly home decorating ideas and projects. Tamara documents her home improvement journey, love of thrifting, tips for space optimization, and creating beautiful spaces.


