


I’ve developed a genuine appreciation for the simple charm of blanket ladders. They combine style and usefulness in a way that appeals to me. I like how they can neatly store and display your blankets and throws in one central spot. And if you have a smaller space, they can give off the illusion of higher ceilings.
The price of a blanket ladder can range from $60 and up. However, you can easily and inexpensively create a blanket ladder from scratch for under $30.
Crafting your very own DIY blanket ladder is extremely budget-friendly. This easy step-by-step tutorial shows how I created a blanket ladder for my guest bedroom.

This post may contain affiliate links, which means I will earn a small commission if you purchase through my link. Please see the full disclosure and privacy policy for more information.
Why a Blanket Ladder?
A blanket ladder has evolved into a chic and popular decor piece, gaining massive traction in recent years. Blanket ladders are great for showcasing your collection of cozy blankets, throws, and quilts.
Its charm knows no bounds as it effortlessly complements various spaces throughout your home, from the welcoming family room and inviting entryway to the cozy living room, bedroom, office, or virtually any corner you desire. The versatile nature of a blanket ladder can breathe life into vacant spaces and empty walls, enriching the aesthetics of the room.
Step-by-Step DIY Blanket Ladder Tutorial
Materials Required
- Two (2) 1 in.x 2 in. x 8ft select pine wood
- Wood glue
- Sanding Sponge or medium grit sandpaper
- Wood nails
- Wood Stain – I chose a Dark Walnut stain, but you can choose your favorite stain color.
- Paint Brush
- Safety gloves
- Pencil
- Optional – nonslip furniture pads
Tools Required (Tools that you may already have in your arsenal)
- Circular Saw or Miter saw
- Tape Measure
- Cordless Drill Set
- Saw Horses
- Level
- Clamps
- Nail Gun
Most of these materials, hand tools, and power tools can be found at your Home Depot or local hardware store.
Step 1 – Determine the blanket ladder measurements.
The first step is determining and measuring the blanket ladder length you want to create. The beautiful thing about this blanket ladder is that it is customizable. Use a measuring tape and mark the measurements of the pine wood with a pencil so you know where to cut when ready.
My exact measurements for my ladder are as follows:
- 5 feet (60 inches) in length
- 16 inches in width
- 12 inches between each rung.
I cut two pieces of pine wood at 60 inches and four pieces at 16 inches. There were four vertical rungs up and down the ladder. Since this is customizable, you can make the ladder taller (with 6-foot pieces) or shorter and add or remove rungs based on your needs.

Step 2 – Make the cuts.
The next step is to cut the marked pieces of pine wood for the blanket ladder. Take the miter saw or circular saw and safely and precisely cut along the pencil lines.

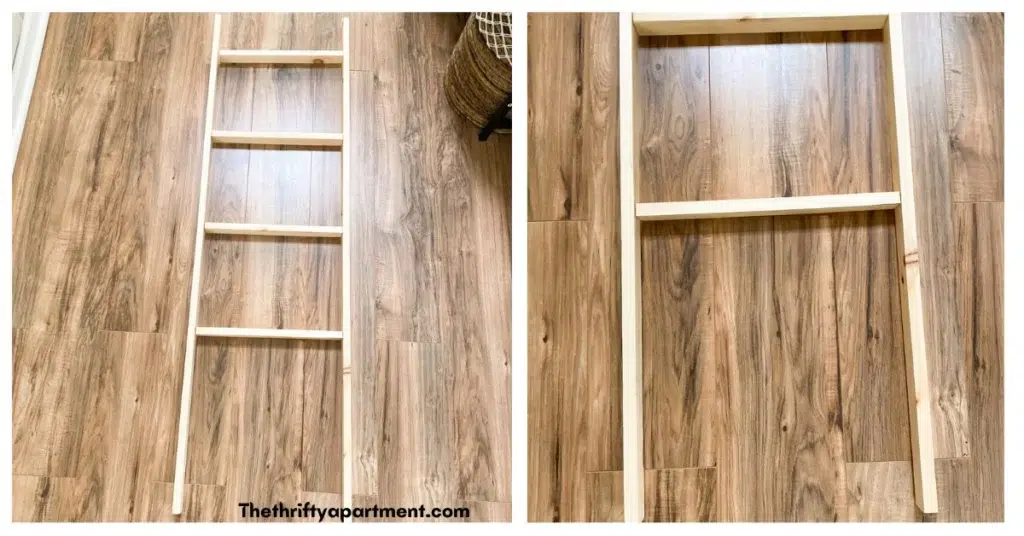
Step 3 – Position and mark the wood pieces
Position and assemble the wooden blanket ladder pieces on a flat surface so you can see how the wooden ladder will look when complete.
Place the two 5-foot-long pieces 16 inches apart from each other. They will serve as the ladder sides. I then positioned my first rung about 6 inches from the top and 12 inches apart, descending the ladder. This allowed about 18 inches from the bottom of the ladder. Mark where the rung will intersect with the sides of the ladder.

Step 4 – Add Wood Glue
Grab your wood glue and add some wood glue to the end of the rung to hold the ladder together. Try wiping away any excess wood glue with an old rag. Then, let it dry for at least an hour. If you have a clamp available, you can use it to hold your rungs in place while it dries.
Step 5 – Drill the nails into the wood.
Now, gather your screws and begin to drill the screws into the wood, starting with the first rung at the top. Since the wooden blanket ladder is already held together with a little wood glue, it will be easy to drill the screws into the wood.
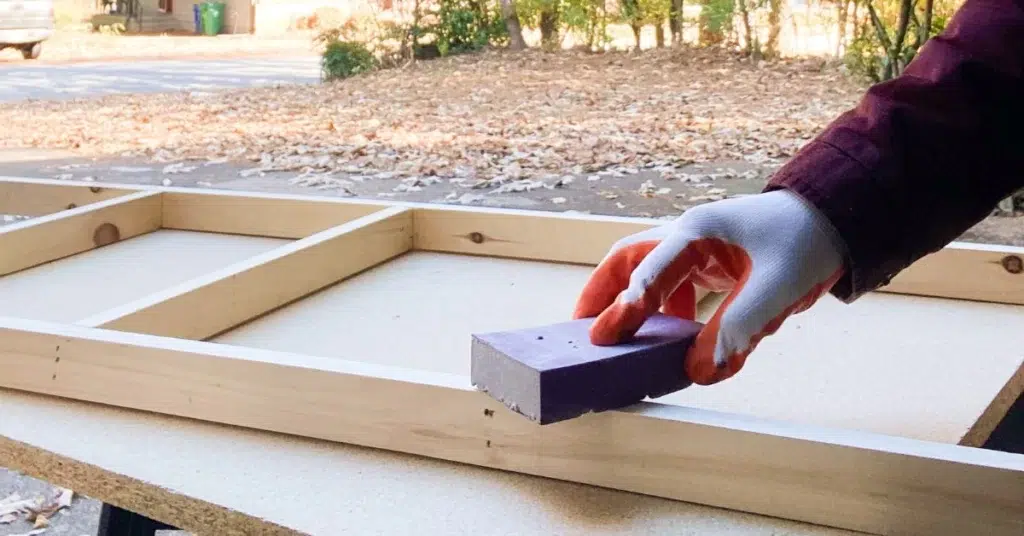
Step 6 – Sand the ladder
Now, it’s time to sand the wood to smooth the rough edges and prep it for staining. I used a 220-grit sanding sponge and sanded it by hand, but if you have an orbital sander available, use it. The orbital sander will sand the wood much faster, requiring less elbow grease.
Sanding will remove imperfections, create a smoother finish, and allow the stain to adhere more easily. When finished sanding, take a cloth and quickly dust the ladder to remove any dust left behind from the sanding.
Step 7 – Apply stain to the ladder.
Use a paintbrush to apply the stain to the pine wood. I chose a darker wood stain color to make it look more rustic. With the type of stain used, I only needed one coat. However, depending on the look that you are going for, additional coats of stain will result in a deeper, richer color.
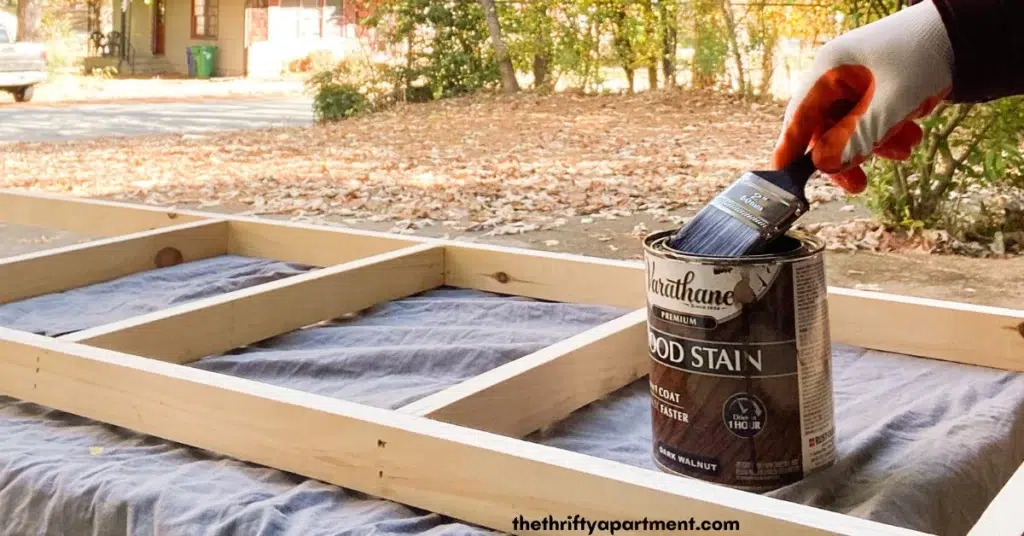
Wait for the stain to dry before displaying your clean blankets. Drying times for stains can vary. The dry time for this particular coat of stain should take a couple of hours.
*Optional Step 8 – Attach non-slip furniture pads
This is an optional step if you want to prevent the walls from scratching. as it is likely that the blanket ladder will scratch the walls. To protect the wall, use a small nonslip furniture pad on the edge of the ladder that leans against the wall.
This will provide a soft, protective solution to prevent the walls from scratching. It will also keep the ladder in place and stop it from moving.

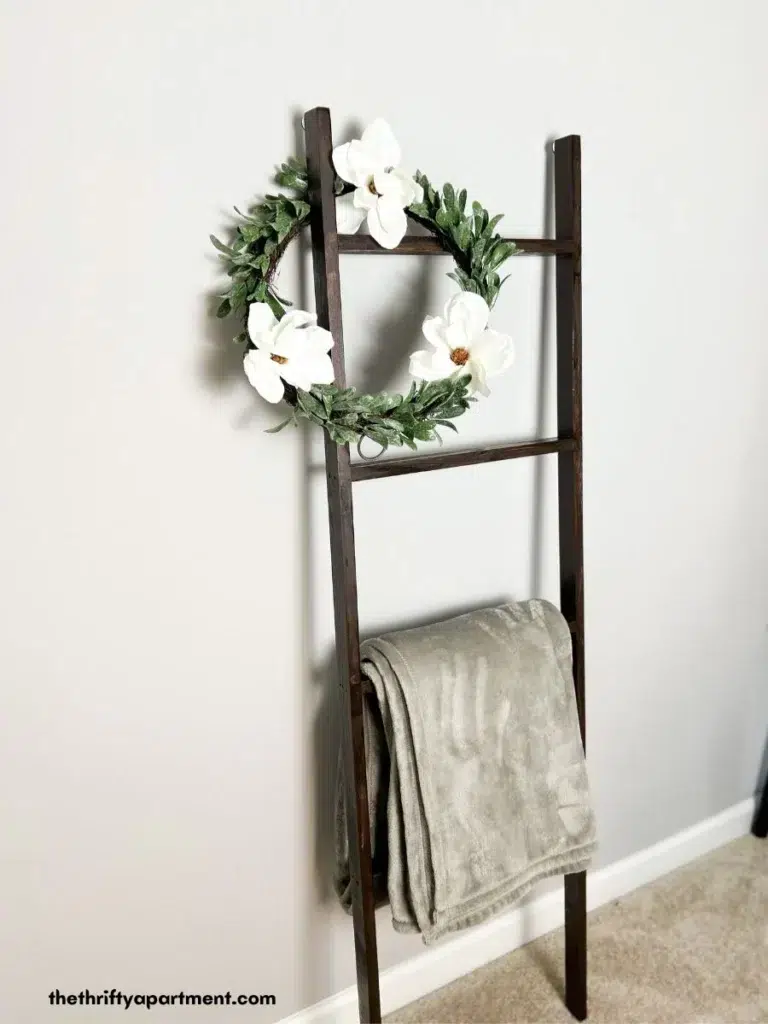

I hope you enjoyed this simple tutorial and easy DIY project. This simple DIY blanket ladder will be great for displaying your cozy comfort blankets. This decorative ladder will truly enhance your already beautiful spaces and rooms.
Other posts you might like:
Please let me know what you think of this easy DIY project below. Feel free also to follow me on my social media pages – Pinterest and Instagram or subscribe to my mailing list for other design inspiration, DIY projects, and home decor ideas.
DIY Blanket Ladder
Equipment
- Circular Saw or Miter saw
- Saw Horses
- Clamps
Materials
- 2 Pine Wood 1 in.x 2 in. x 8ft
- Wood Glue
- Sanding Sponge or medium grit sandpaper
- Wood Nails
- Wood Stain I chose a Dark Walnut stain, but you can choose your favorite stain color.
- Paint Brush
- Safety Gloves
- Pencil
- Nonslip Furniture Pads Optional
Instructions
- The first step is determining and measuring the blanket ladder length you want to create. The beautiful thing about this blanket ladder is that it is customizable. Use a measuring tape and mark the measurements of the pine wood with a pencil so you know where to cut when ready.My exact measurements for my ladder are as follows:• 5 feet (60 inches) in length• 16 inches in width• 12 inches between each rung.I cut two pieces of pine wood at 60 inches and four pieces at 16 inches. There were four vertical rungs up and down the ladder. Since this is customizable, you can make the ladder taller (with 6-foot pieces) or shorter and add or remove rungs based on your needs.
- The next step is to cut the marked pieces of pine wood for the blanket ladder. Take the miter saw or circular saw and safely and precisely cut along the pencil lines.
- Position and assemble the wooden blanket ladder pieces on a flat surface so you can see how the wooden ladder will look when complete.Place the two 5-foot-long pieces 16 inches apart from each other. They will serve as the ladder sides. I then positioned my first rung about 6 inches from the top and 12 inches apart, descending the ladder. This allowed about 18 inches from the bottom of the ladder. Mark where the rung will intersect with the sides of the ladder.
- Now, it’s time to sand the wood to smooth the rough edges and prep it for staining. I used a 220-grit sanding sponge and sanded it by hand, but if you have an orbital sander available, use it. The orbital sander will sand the wood much faster, requiring less elbow grease.Sanding will remove imperfections, create a smoother finish, and allow the stain to adhere more easily. When finished sanding, take a cloth and quickly dust the ladder to remove any dust left behind from the sanding.
- Use a paintbrush to apply the stain to the pine wood. I chose a darker wood stain color to make it look more rustic. With the type of stain used, I only needed one coat. However, depending on the look that you are going for, additional coats of stain will result in a deeper, richer color.Wait for the stain to dry before displaying your clean blankets. Drying times for stains can vary. The dry time for this particular coat of stain should take a couple of hours.
- This is an optional step if you want to prevent the walls from scratching. as it is likely that the blanket ladder will scratch the walls. To protect the wall, use a small nonslip furniture pad on the edge of the ladder that leans against the wall.This will provide a soft, protective solution to prevent the walls from scratching. It will also keep the ladder in place and stop it from moving.
Tamara White is the creator and founder of The Thrifty Apartment, a home decor and DIY blog that focuses on affordable and budget-friendly home decorating ideas and projects. Tamara documents her home improvement journey, love of thrifting, tips for space optimization, and creating beautiful spaces.
- Tamara White
- Tamara White
- Tamara White
- Tamara White
- Tamara White
- Tamara White
- Tamara White
- Tamara White
- Tamara White
- Tamara White
- Tamara White
- Tamara White
- Tamara White
- Tamara White
- Tamara White
- Tamara White
- Tamara White
- Tamara White
- Tamara White
- Tamara White
- Tamara White
- Tamara White
- Tamara White
- Tamara White
- Tamara White
- Tamara White
- Tamara White
- Tamara White
- Tamara White
- Tamara White
- Tamara White
- Tamara White
- Tamara White
- Tamara White
- Tamara White
- Tamara White
- Tamara White
- Tamara White
- Tamara White
- Tamara White
- Tamara White
- Tamara White
- Tamara White
- Tamara White
- Tamara White
- Tamara White
- Tamara White
- Tamara White
- Tamara White
- Tamara White
- Tamara White
- Tamara White
- Tamara White
- Tamara White
- Tamara White
- Tamara White
- Tamara White
- Tamara White
- Tamara White
- Tamara White
- Tamara White
- Tamara White
- Tamara White
- Tamara White
- Tamara White
- Tamara White
- Tamara White
- Tamara White
- Tamara White
- Tamara White
- Tamara White
- Tamara White
- Tamara White
- Tamara White
- Tamara White
- Tamara White
- Tamara White
- Tamara White
- Tamara White
- Tamara White
- Tamara White
- Tamara White
- Tamara White
- Tamara White
- Tamara White
- Tamara White
- Tamara White
- Tamara White
- Tamara White
- Tamara White
- Tamara White
- Tamara White
- Tamara White
- Tamara White
- Tamara White
- Tamara White
- Tamara White
- Tamara White
- Tamara White
- Tamara White
- Tamara White
- Tamara White
- Tamara White
- Tamara White
- Tamara White
- Tamara White
- Tamara White
- Tamara White
- Tamara White
- Tamara White
- Tamara White
- Tamara White
- Tamara White
- Tamara White
- Tamara White
- Tamara White
- Tamara White
- Tamara White
- Tamara White
- Tamara White
- Tamara White
- Tamara White
- Tamara White
- Tamara White
- Tamara White
- Tamara White
- Tamara White
- Tamara White
- Tamara White
- Tamara White
- Tamara White
- Tamara White
- Tamara White
- Tamara White
- Tamara White
- Tamara White
- Tamara White
- Tamara White
- Tamara White
- Tamara White
- Tamara White
- Tamara White
- Tamara White
- Tamara White
- Tamara White
- Tamara White
- Tamara White
- Tamara White
- Tamara White
- Tamara White
- Tamara White
- Tamara White
- Tamara White
- Tamara White
- Tamara White
- Tamara White
- Tamara White
- Tamara White
- Tamara White
- Tamara White
- Tamara White
- Tamara White
- Tamara White
- Tamara White
- Tamara White
- Tamara White
- Tamara White
- Tamara White
- Tamara White
- Tamara White
- Tamara White
- Tamara White
- Tamara White
- Tamara White
- Tamara White
- Tamara White
- Tamara White
- Tamara White
- Tamara White
- Tamara White
- Tamara White
- Tamara White
- Tamara White
- Tamara White
- Tamara White
- Tamara White
- Tamara White
- Tamara White
- Tamara White
- Tamara White
- Tamara White
- Tamara White
- Tamara White
- Tamara White
- Tamara White
- Tamara White
- Tamara White
- Tamara White
- Tamara White
- Tamara White
- Tamara White
- Tamara White
- Tamara White
- Tamara White
- Tamara White
- Tamara White
- Tamara White
- Tamara White
- Tamara White
- Tamara White
- Tamara White
- Tamara White
- Tamara White
- Tamara White
- Tamara White
- Tamara White
- Tamara White
- Tamara White
- Tamara White
- Tamara White
- Tamara White
- Tamara White
- Tamara White
- Tamara White
- Tamara White
- Tamara White
- Tamara White
- Tamara White
- Tamara White
- Tamara White
- Tamara White
- Tamara White
- Tamara White
- Tamara White
- Tamara White
- Tamara White
- Tamara White
- Tamara White
- Tamara White


