


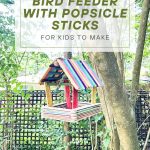


Watching birds flock to a feeder is a great way to see them up close and connect with nature. Crafting a bird feeder can be a fun project with the kids. The bird feeder may attract various birds to your backyard that the kids will love to watch.
It is also a great way for the kids to learn how to identify different bird species while providing a valuable food source for the beautiful birds. This learning opportunity for kids will teach them the importance of providing food and shelter for wildlife.
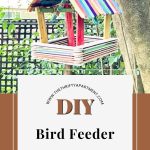
So get ready to craft a bird feeder that the kids will enjoy making with this easy DIY project.
What you’ll need
- Popsicle sticks – I used two packs of popsicle sticks, mixing standard colors with multicolor sticks.
- Wood Glue
- Twine
- Birdseed

All these supplies can be found at the dollar store. The entire project cost me less than $7. However, I provided links to the same materials on Amazon. Once you have all your supplies, you can start crafting your bird feeder.
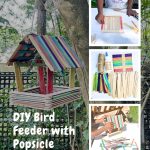
DIY Bird Feeder Craft
Step 1
Start by laying out the materials on a flat surface.
Step 2
Create a foundation base by attaching four individual popsicle sticks, connecting the edges to each popsicle stick – and creating a square.

Step 3
Start laying eight individual popsicle sticks side by side and glue them on top of the base.

Step 4
Place another popsicle stick horizontally across the top of the ten vertical sticks. Glue the horizontal stick in place. Repeat this process on each corner. This will create the base and hold it in place.

My daughter wanted to alternate colored popsicle sticks in the base to give it pops of color.
Step 5
Repeat steps 4 eight times. This will now give you an open crate-like structure with four walls.

Step 6
Take two popsicle sticks and glue them to each other. Place them inside the base’s corner.
Repeat this process on all four corners. Placing the sticks in the corner of the base will give the roof something to hold on to.
Give the glue some time to dry before moving to the next step.

Step 7
Now it’s time to create the roof for the bird feeder.
Since the dollar store colored sticks are small, they require more popsicle sticks. You will need to place 14 popsicle stick side by side. It should be less if you use standard popsicle sticks. Lay a couple of popsicle sticks vertically across those sticks and glue them. Then allow it to dry.

Create another set of 14 popsicle sticks to make the second side of the roof.
Step 8
Attach the roof to the base. This part required a bit more precision and care. It took us a few trials to get it right, but we relied on the twine to hold the roof together. The glued twine at the top of the roof allowed the roof more flexibility to create a slant in the roof. Give it time to dry.

Step 9
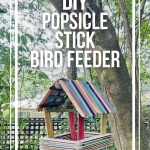
Use a piece of twine to create the cord to hang the feeder from a tree securely. Now, you can fill the feeder with birdseed and head outside to hang it on a tree.


Tips on attracting more birds to your feeder
There’s no telling what kind of birds you may attract with this bird feeder. Depending on where you live, you could attract sparrows, finches, bluejays, or cardinals.
To attract these types of birds to your feeder (or similar birds), here are a few things you could do:
- Make sure to choose an appropriate location for the bird feeder. Place in an area that’s easily visible to birds and away from potential predators like cats and squirrels.
- Offer enough bird seeds and refill the bird feeder often.

DIY Bird Feeder
Materials
- 2 Packs Multicolor Popsicle Sticks
- Wood Glue
- Twine
- Birdseed
Instructions
- Start by laying out the materials on a flat surface.
- Create a foundation base by attaching four individual popsicle sticks, connecting the edges to each popsicle stick – and creating a square.
- Start laying eight individual popsicle sticks side by side and glue them on top of the base.
- Place another popsicle stick horizontally across the top of the ten vertical sticks. Glue the horizontal stick in place. Repeat this process on each corner. This will create the base and hold it in place. My daughter wanted to alternate colored popsicle sticks in the base to give it pops of color.
- Repeat steps 4 eight times. This will now give you an open crate-like structure with four walls.
- Take two popsicle sticks and glue them to each other. Place them inside the base’s corner. Repeat this process on all four corners. Placing the sticks in the corner of the base will give the roof something to hold on to.Give the glue some time to dry before moving to the next step.
- Now it’s time to create the roof for the bird feeder. Since the dollar store colored sticks are small, they require more popsicle sticks. You will need to place 14 popsicle stick side by side. It should be less if you use standard popsicle sticks. Lay a couple of popsicle sticks vertically across those sticks and glue them. Then allow it to dry. Create another set of 14 popsicle sticks to make the second side of the roof.
- Attach the roof to the base. This part required a bit more precision and care. It took us a few trials to get it right, but we relied on the twine to hold the roof together. The glued twine at the top of the roof allowed the roof more flexibility to create a slant in the roof. Give it time to dry.
- Use a piece of twine to create the cord to hang the feeder from a tree securely. Now, you can fill the feeder with birdseed and head outside to hang it on a tree.
More DIY projects you might like:
- 12 Cute and Colorful Easter Wreaths To Welcome Spring into Your Home
- How to Paint a Vase with Acrylic Paint to Look Expensive
- How to DIY a Farmhouse Rustic Coat Rack
- How to Build a Frame for a Canvas Painting
- 15 Creative Tulip Crafts for Kids
Feel free also to follow me on my social media pages – Pinterest and Instagram or subscribe to my mailing list for other design inspiration and home decor ideas.
Tamara White is the creator and founder of The Thrifty Apartment, a home decor and DIY blog that focuses on affordable and budget-friendly home decorating ideas and projects. Tamara documents her home improvement journey, love of thrifting, tips for space optimization, and creating beautiful spaces.
- Tamara White
- Tamara White
- Tamara White
- Tamara White
- Tamara White
- Tamara White
- Tamara White
- Tamara White
- Tamara White
- Tamara White
- Tamara White
- Tamara White
- Tamara White
- Tamara White
- Tamara White
- Tamara White
- Tamara White
- Tamara White
- Tamara White
- Tamara White
- Tamara White
- Tamara White
- Tamara White
- Tamara White
- Tamara White
- Tamara White
- Tamara White
- Tamara White
- Tamara White
- Tamara White
- Tamara White
- Tamara White
- Tamara White
- Tamara White
- Tamara White
- Tamara White
- Tamara White
- Tamara White
- Tamara White
- Tamara White
- Tamara White
- Tamara White
- Tamara White
- Tamara White
- Tamara White
- Tamara White
- Tamara White
- Tamara White
- Tamara White
- Tamara White
- Tamara White
- Tamara White
- Tamara White
- Tamara White
- Tamara White
- Tamara White
- Tamara White
- Tamara White
- Tamara White
- Tamara White
- Tamara White
- Tamara White
- Tamara White
- Tamara White
- Tamara White
- Tamara White
- Tamara White
- Tamara White
- Tamara White
- Tamara White
- Tamara White
- Tamara White
- Tamara White
- Tamara White
- Tamara White
- Tamara White
- Tamara White
- Tamara White
- Tamara White
- Tamara White
- Tamara White
- Tamara White
- Tamara White
- Tamara White
- Tamara White
- Tamara White
- Tamara White
- Tamara White
- Tamara White
- Tamara White
- Tamara White
- Tamara White
- Tamara White
- Tamara White
- Tamara White
- Tamara White
- Tamara White
- Tamara White
- Tamara White
- Tamara White
- Tamara White
- Tamara White
- Tamara White
- Tamara White
- Tamara White
- Tamara White
- Tamara White
- Tamara White
- Tamara White
- Tamara White
- Tamara White
- Tamara White
- Tamara White
- Tamara White
- Tamara White
- Tamara White
- Tamara White
- Tamara White
- Tamara White
- Tamara White
- Tamara White
- Tamara White
- Tamara White
- Tamara White
- Tamara White
- Tamara White
- Tamara White
- Tamara White
- Tamara White
- Tamara White
- Tamara White
- Tamara White
- Tamara White
- Tamara White
- Tamara White
- Tamara White
- Tamara White
- Tamara White
- Tamara White
- Tamara White
- Tamara White
- Tamara White
- Tamara White
- Tamara White
- Tamara White
- Tamara White
- Tamara White
- Tamara White
- Tamara White
- Tamara White
- Tamara White
- Tamara White
- Tamara White
- Tamara White
- Tamara White
- Tamara White
- Tamara White
- Tamara White
- Tamara White
- Tamara White
- Tamara White
- Tamara White
- Tamara White
- Tamara White
- Tamara White
- Tamara White
- Tamara White
- Tamara White
- Tamara White
- Tamara White
- Tamara White
- Tamara White
- Tamara White
- Tamara White
- Tamara White
- Tamara White
- Tamara White
- Tamara White
- Tamara White
- Tamara White
- Tamara White
- Tamara White
- Tamara White
- Tamara White
- Tamara White
- Tamara White
- Tamara White
- Tamara White
- Tamara White
- Tamara White
- Tamara White
- Tamara White
- Tamara White
- Tamara White
- Tamara White
- Tamara White
- Tamara White
- Tamara White
- Tamara White
- Tamara White
- Tamara White
- Tamara White
- Tamara White
- Tamara White
- Tamara White
- Tamara White
- Tamara White
- Tamara White
- Tamara White
- Tamara White
- Tamara White
- Tamara White
- Tamara White
- Tamara White
- Tamara White
- Tamara White
- Tamara White
- Tamara White
- Tamara White
- Tamara White
- Tamara White
- Tamara White
- Tamara White
- Tamara White
- Tamara White
- Tamara White
- Tamara White
- Tamara White
- Tamara White
- Tamara White
- Tamara White
- Tamara White
- Tamara White
- Tamara White
- Tamara White
- Tamara White
- Tamara White
- Tamara White
- Tamara White
- Tamara White
- Tamara White
- Tamara White
- Tamara White
- Tamara White


My 11 year old loves to build things and this looks like the perfect craft for us! Thank you for sharing your detailed steps, we’ll have to give it a go!
Thank you. My little one had so much fun making it.