


A good shower experience can drastically improve your mood, relieve tension, and massage away aches and pains. And the shower head that you use can greatly influence and impact this experience. So if you have an old showerhead that isn’t entirely functioning as you want, it might be time to replace it.
Replacing a showerhead is a relatively simple task. Follow along as I show you how to DIY and install your own dual shower head like a pro, saving you time and money. This DIY shower head replacement can be done in under an hour following these simple steps.
Why replace the showerhead?
Although a showerhead is usually an afterthought for most people, it can literally make or break your shower experience. The average person spends 10-15 minutes taking a shower daily. Some might argue that this time can be one of the best parts of your day.
A new head may reduce the presence of bacteria growing in the showerhead, amplify low water pressure and improve the water flow rate, relieve body aches and pains, reduce water bills, especially if there is an existing leak, and enhance the functionality of the shower.
So why not invest in a new showerhead? The good news is that it’s easy and affordable to do so.
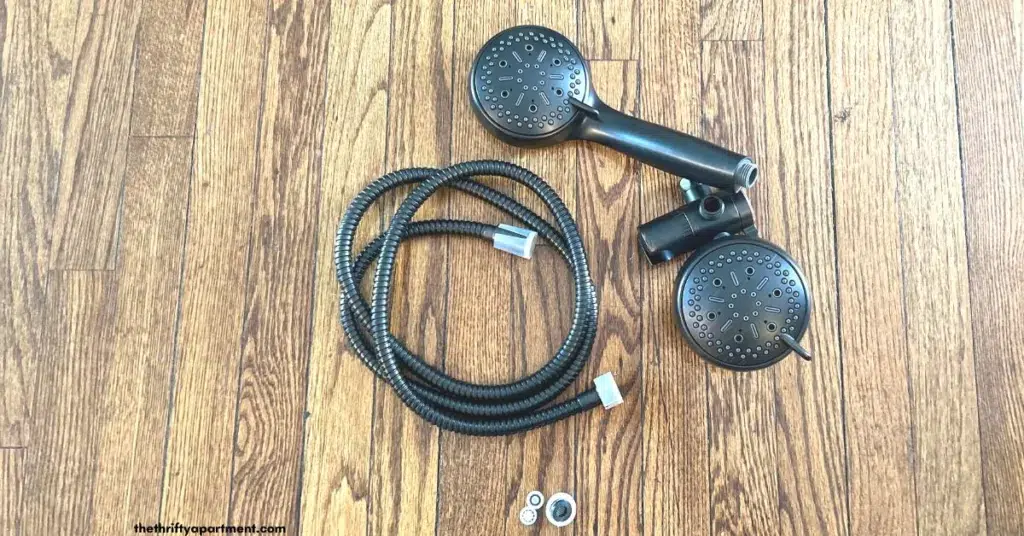
Supplies Needed
- Dual Shower Head – I choose this 6 in. High-Pressure Dual Shower Head is well-made, modern, and sturdy, but it also effortlessly matches the hardware throughout my bathroom. This dual showerhead is very much spa-like, with 64 different spray patterns.
- Adjustable Wrench and Pair of Pliers – I used the 8-piece Irwin Vise-Grip GrooveLock Pliers Set. It is my go-to for most home DIY projects.
- Teflon tape or plumber’s tape
- Cleaning rags
Most of these supplies are at your local home improvement store or hardware store.
Instructions on How to Change a Shower Head
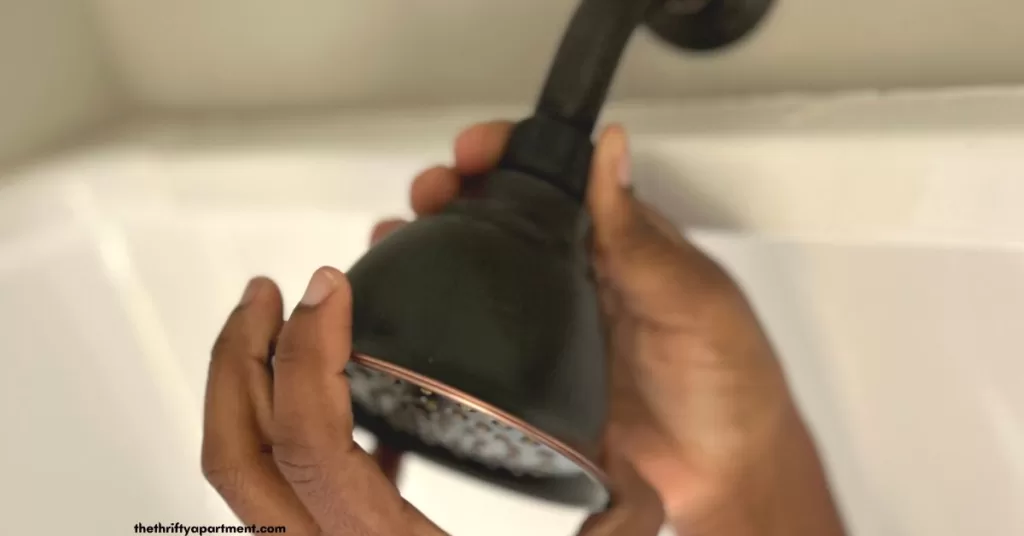
Step 1 – Remove the old shower head.
The first step is to make sure the pipes are off. Then screw off the existing shower head by turning it counterclockwise.
If it does not move for some reason, you may need to give it a bit more elbow grease. Wrap an old rag around the shower arm (for protection), clamp the adjustable wrench around the head’s base, and twist the old showerhead off until it is removed from the arm.
Step 2 – Clean up the shower arm.
Once you have removed the shower head, the next step is to clean the shower arm. The shower arm is connected inside the wall to the shower valve.
The shower arm will likely have some rust, gunk buildup, and old Teflon tape, so it’s best to clean it off with a rag (inside and out). This may help with increasing the water flow and water pressure.
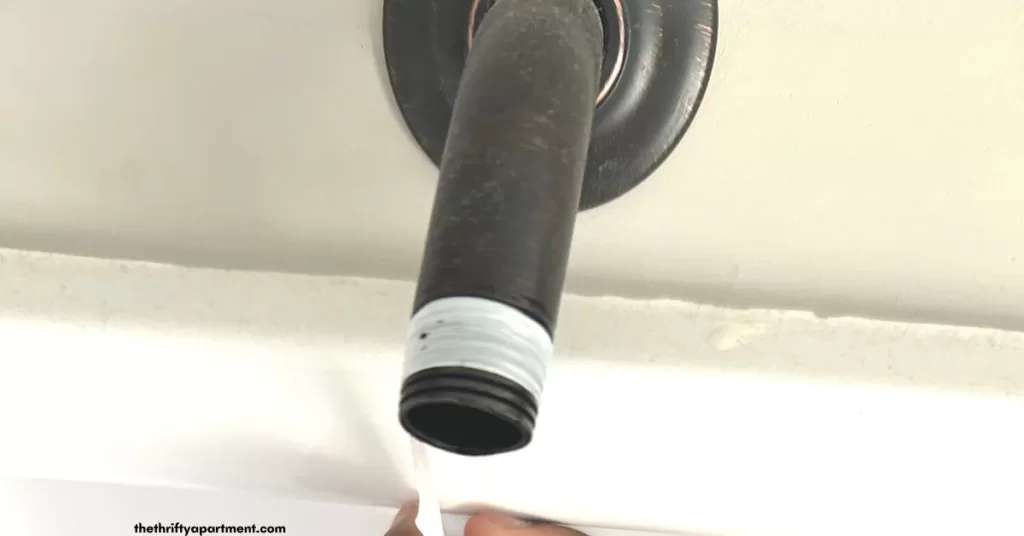
Step 3: Apply Teflon Tape
Apply Teflon tape around the threads of the shower arm. Continue to wrap the tape around the end of the shower arm (maybe 2-3 times), then press down using your index finger and thumb.
This Teflon tape gives it a watertight seal, allowing the new shower head to grip the arm, preventing potential leaks. This should give it a good seal.
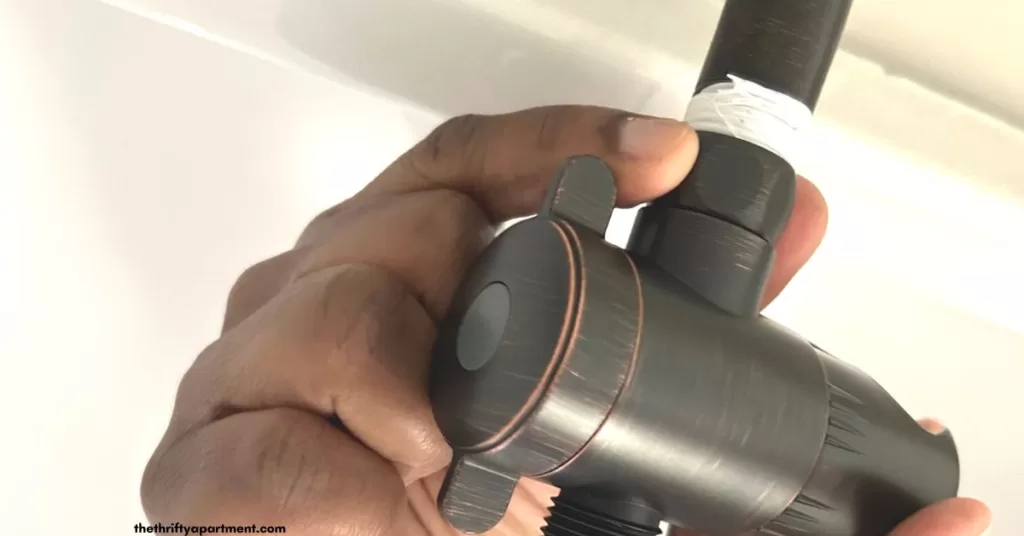
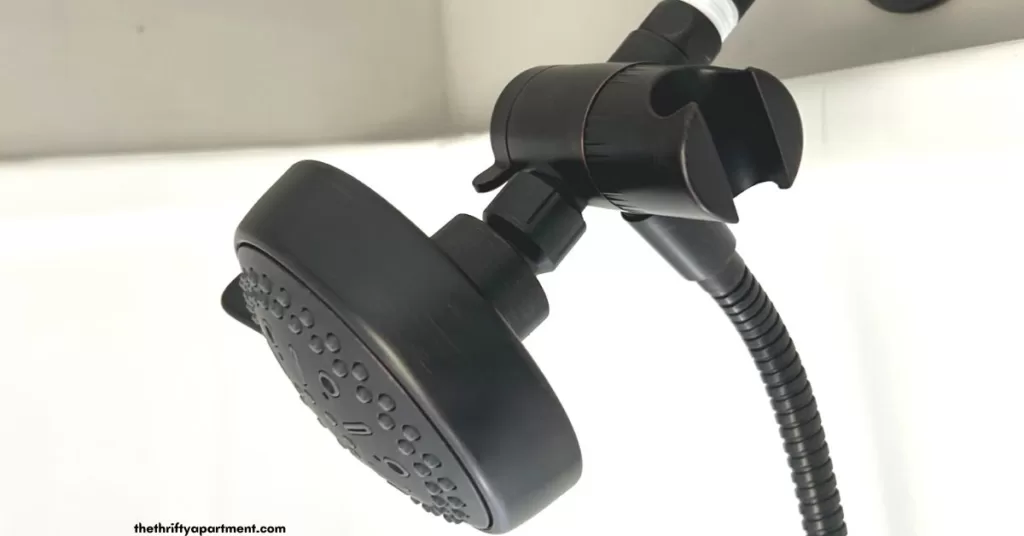
Step 4 – Attach the 3-way diverter
Attach the 3-way diverter to the shower arm. Tighten the diverter on the shower arm with a wrench.
Step 5 – Install the replacement showerhead
Put the washer into the shower head fitting and attach it to the 3-way diverter. Then, attach the washer to the hex hose fitting to the 3-way diverter. Put the washer into the hose fitting and attach it to the hand shower.
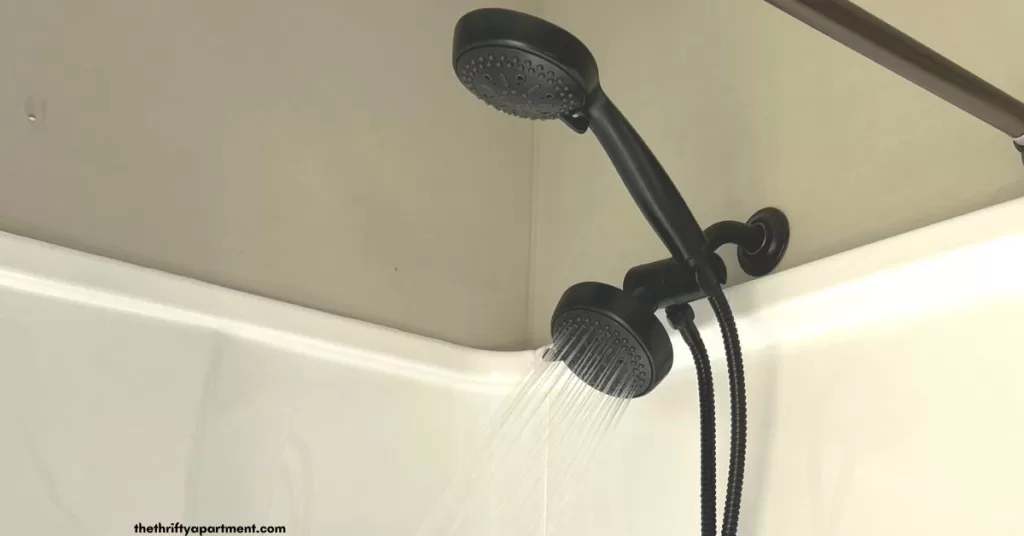
Step 6- Check for any leaks
To finish the project, you must check your work for leaks. Turn the shower faucet handle on to see if any water leak is seeping from the side of the new showerhead. This is an excellent time to ensure the new showerhead is not malfunctioning.
If there is a water leak, you may need to apply Teflon tape to shower arm threads to eliminate the amount of water coming out. This will require removing the shower head once more.
The steps involved in installing a showerhead may vary depending on the type of replacement showerhead chosen. Therefore, you may want to check the manufacturer’s installation guide for additional tips.
How to Choose the Right Showerhead?
Shower heads come in a wide range of spray patterns, color finishes, water pressure, and aesthetics. The direction of the spray, water pressure, the way it mounts, and even where the spray hits your body will depend heavily on the type of shower head you choose.
You will need to figure out your preference for shower style. While the process of installation may depend on the type of showerhead you choose, consider the following when selecting your showerhead:
Mount – Most showerheads are angled on a shower arm that protrudes from the top of one wall, allowing the shower head to spray down into the shower. These shower arms can be used with fixed, dual, and handheld models.
A ceiling-mounted shower head is ideal for a rainfall shower head. It connects to a shower arm mounted in the ceiling, allowing the water to fall down on you. However, if you don’t already have the existing plumbing for this type of shower head, you will need to factor in the cost to install this plumbing if you want a ceiling-mounted shower head.
Spray Pattern – The spray pattern of a shower head is typically chosen based on personal preference. Standard shower head options include rainfall, massage, and jet spray patterns. Massage and jet settings on the shower head can also give users a mild hydrotherapy experience, while an overhead rainfall spray is purely for calm, quiet relaxation.
Shower Head Styles – Shower heads can come in so many styles. There are several types of shower heads to choose from when you are looking to replace the old fixture in your bathroom, including fixed, rainfall, handheld, dual, and panel shower heads. The options are endless.
- Fixed Shower Head– The most affordable and basic option for the shower is a fixed showerhead. These plumbing fixtures connect to a protruding shower arm, and the spray’s direction can typically be adjusted, though this fixed shower head can only spray within a limited range.
- Rainfall Shower Head – this showerhead is usually larger in size than fixed or handheld shower heads, and they are made for overhead installation. The water falls straight down into the shower, creating a relaxing shower experience that is intended to mimic heavy rainfall.
- Handheld Shower Head– The handheld shower head typically looks and feels like fixed shower heads, and they can even sit in a wall mount to spray down at an angle into the shower. The handheld isn’t directly attached to the shower arm; it is connected to a long flexible hose, allowing the shower head to be held in your hand for optimal control. This option is excellent for cleaning every nook and cranny in the bathroom or for families with small children that need flexibility when bathing their child.
- A Dual shower head provides the best of both worlds, incorporating the style of a rainfall shower head or fixed shower head and a handheld shower head.
I hope you found this quick and easy upgrade helpful. As you can see, to complete this installation, you don’t have to be an experienced DIYer or professional plumber. This DIY project is a small upgrade that is an excellent introduction to the art of plumbing. It is also an easy home makeover idea you can do on a tight budget that may ultimately help with your monthly water bills.
Whatever your desire and price point, there is a showerhead for you. However, choose a showerhead that fits seamlessly for the best DIY installation and ensure that you have the proper plumbing configuration so you don’t have to hire a plumber.
Please drop a comment below to let me know what you think. Feel free to follow me on my social media pages – Pinterest and Instagram or subscribe to my mailing list for other design inspiration and home decor ideas.
Tamara White is the creator and founder of The Thrifty Apartment, a home decor and DIY blog that focuses on affordable and budget-friendly home decorating ideas and projects. Tamara documents her home improvement journey, love of thrifting, tips for space optimization, and creating beautiful spaces.
- Tamara White
- Tamara White
- Tamara White
- Tamara White
- Tamara White
- Tamara White
- Tamara White
- Tamara White
- Tamara White
- Tamara White
- Tamara White
- Tamara White
- Tamara White
- Tamara White
- Tamara White
- Tamara White
- Tamara White
- Tamara White
- Tamara White
- Tamara White
- Tamara White
- Tamara White
- Tamara White
- Tamara White
- Tamara White
- Tamara White
- Tamara White
- Tamara White
- Tamara White
- Tamara White
- Tamara White
- Tamara White
- Tamara White
- Tamara White
- Tamara White
- Tamara White
- Tamara White
- Tamara White
- Tamara White
- Tamara White
- Tamara White
- Tamara White
- Tamara White
- Tamara White
- Tamara White
- Tamara White
- Tamara White
- Tamara White
- Tamara White
- Tamara White
- Tamara White
- Tamara White
- Tamara White
- Tamara White
- Tamara White
- Tamara White
- Tamara White
- Tamara White
- Tamara White
- Tamara White
- Tamara White
- Tamara White
- Tamara White
- Tamara White
- Tamara White
- Tamara White
- Tamara White
- Tamara White
- Tamara White
- Tamara White
- Tamara White
- Tamara White
- Tamara White
- Tamara White
- Tamara White
- Tamara White
- Tamara White
- Tamara White
- Tamara White
- Tamara White
- Tamara White
- Tamara White
- Tamara White
- Tamara White
- Tamara White
- Tamara White
- Tamara White
- Tamara White
- Tamara White
- Tamara White
- Tamara White
- Tamara White
- Tamara White
- Tamara White
- Tamara White
- Tamara White
- Tamara White
- Tamara White
- Tamara White
- Tamara White
- Tamara White
- Tamara White
- Tamara White
- Tamara White
- Tamara White
- Tamara White
- Tamara White
- Tamara White
- Tamara White
- Tamara White
- Tamara White
- Tamara White
- Tamara White
- Tamara White
- Tamara White
- Tamara White
- Tamara White
- Tamara White
- Tamara White
- Tamara White
- Tamara White
- Tamara White
- Tamara White
- Tamara White
- Tamara White
- Tamara White
- Tamara White
- Tamara White
- Tamara White
- Tamara White
- Tamara White
- Tamara White
- Tamara White
- Tamara White
- Tamara White
- Tamara White
- Tamara White
- Tamara White
- Tamara White
- Tamara White
- Tamara White
- Tamara White
- Tamara White
- Tamara White
- Tamara White
- Tamara White
- Tamara White
- Tamara White
- Tamara White
- Tamara White
- Tamara White
- Tamara White
- Tamara White
- Tamara White
- Tamara White
- Tamara White
- Tamara White
- Tamara White
- Tamara White
- Tamara White
- Tamara White
- Tamara White
- Tamara White
- Tamara White
- Tamara White
- Tamara White
- Tamara White
- Tamara White
- Tamara White
- Tamara White
- Tamara White
- Tamara White
- Tamara White
- Tamara White
- Tamara White
- Tamara White
- Tamara White
- Tamara White
- Tamara White
- Tamara White
- Tamara White
- Tamara White
- Tamara White
- Tamara White
- Tamara White
- Tamara White
- Tamara White
- Tamara White
- Tamara White
- Tamara White
- Tamara White
- Tamara White
- Tamara White
- Tamara White
- Tamara White
- Tamara White
- Tamara White
- Tamara White
- Tamara White
- Tamara White
- Tamara White
- Tamara White
- Tamara White
- Tamara White
- Tamara White
- Tamara White
- Tamara White
- Tamara White
- Tamara White
- Tamara White
- Tamara White
- Tamara White
- Tamara White
- Tamara White
- Tamara White
- Tamara White
- Tamara White
- Tamara White
- Tamara White
- Tamara White
- Tamara White
- Tamara White
- Tamara White
- Tamara White
- Tamara White
- Tamara White
- Tamara White
- Tamara White
- Tamara White
- Tamara White
- Tamara White
- Tamara White
- Tamara White
- Tamara White
- Tamara White