

Nowadays, there is so much fanfare surrounding refinishing and painting old wooden furniture. But there is something to be said about an original, authentic piece of wood furniture – from its history to the quality of its material.
Wooden furniture adds a touch of elegance and warmth to any home. And as much as I love the idea of modernizing a piece of furniture, sometimes a piece of furniture needs a good old-fashioned cleaning to bring it back to life.
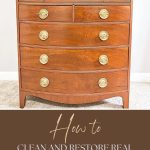
That said, if you have a unique piece of wooden furniture that you thrifted, a family heirloom, or one sitting around the garage waiting to be rescued, here’s a step-by-step guide on deep cleaning your wood furniture to make it look new again.

This post may contain affiliate links, which means I will earn a small commission if you purchase through my link. Please see the full disclosure and privacy policy for more information.
Why Clean Wood Furniture
It is often difficult to come by natural wood furniture pieces in today’s marketplace. Most furniture in stores and online is made with laminate or veneer. And if you find real wood furniture (that is not used), it is often very expensive.
Therefore, when you find a piece of wooden furniture, it is in your best interest to keep and preserve it.
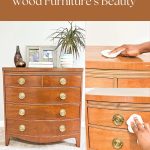
Cleaning wood furniture helps to bring out its natural beauty. It also helps to remove any dust and dirt that may be present on the wood surface while maintaining its structural integrity, preventing issues like warping, cracking, or splitting. Regular cleaning, polishing, and maintenance ensure it continues showcasing its inherent beauty.
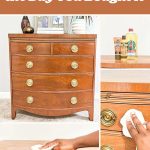
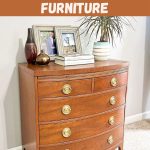
Dresser Before Cleaning
Here’s a look at the dresser before it was cleaned. This dresser was purchased at a local Goodwill thrift store for $22 for a spare bedroom. It was already in pretty good condition and just needed to be cleaned.

Supplies Needed
- Murphy Oil Soap Wood Cleaner
- Howard Products Feed-N-Wax Wood Polish & Conditioner
- Microfiber Cloth or rag
- Wood Filler (optional)
- Barkeeper’s Friend (optional)
- Vaseline (optional)

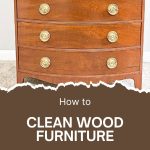
Step-by-Step Guide on How to Clean Old Wood Furniture
Step 1 – Clean the Furniture with Soap
The first step is to pour Murphy’s oil soap into a large bowl, bucket, or pot of warm water. You can also use mild dish soap if you do not have Murphy’s oil soap.

Take a clean microfiber cloth or rag and dip the cloth into the cleaning solution. Wring out the excess water and begin wiping down the wooden furniture. Avoid using too much water or leaving excess water on the surface of the wood. This could leave water stains on the furniture and possibly even warp the wood.

Ensure all the surfaces, including the sides, top, and inside of the drawers, get cleaned with mild soap. The soap will help remove layers of grime and dirt on the wooden piece.

Step 2 – Treat and remove stains and scratches.
If your wood furniture has any scratches or stains, there are a few ways to attempt to remove it. Here are the techniques that you can try.
- Scratches – Use wood filler to care for the deep, visible scratches on the wood furniture. This will require some light sanding and the possible application of a new finish coat.
- Water Ring – If there are water rings or marks on the furniture, you can apply Vaseline or mayonnaise directly on the impacted area of the wood. Give it about an hour or so to absorb. Wipe it away with a damp cloth and continue to wipe until the stain is no longer there.

- Sticky spots or Glue Residue – Try using a plastic scraper to remove stickers, sticky residue, and glue remnants on the furniture. You can also use the edge of a credit card to do this. Once you get up as much as you can, put a small amount of olive oil on a clean cloth and rub the affected area. This should help remove the remaining sticky or glue residue.
Step 3 – Polish the furniture
Apply the Howard Products Feed-N-Wax Wood Polish & Conditioner liberally to the wood furniture using a dry microfiber cloth and rub it on its surface. Polishing the furniture will help to restore its original shine and luster while protecting it from damage that future spills, stains, and scratches may cause.

Make sure you apply the furniture polish evenly, following the wood grain. Go in circular motions with the soft cloth when rubbing the polish onto the entire surface.

Then let it soak in and dry. You should now have a cleaner, richer-looking wood piece of furniture.


How to clean the old furniture hardware
Do you have vintage furniture with handles or knobs that look a bit dated? The best way to clean old furniture hardware is by using Barkeeper’s friend. Bar Keepers Friend is a cleaning product made with oxalic acid as its main ingredient and can break down and remove rust stains, lime deposits, stubborn stains, and scratches on various things. This makes it the perfect cleaning agent for cleaning your old vintage hardware.
There is a liquid version and a powder version of Barkeeper’s Friend. I used the liquid version to clean the handles of the wood furniture.

Start by removing the hardware from the old furniture with a screwdriver. Fill a glass bowl of water and put the hardware and a generous amount of the barkeeper’s friend in it. Let it soak for about an hour or so.
After soaking, take an old toothbrush or scrubbing sponge and rub the hardware, making sure to get into every nook and cranny of the hardware. Finally, rinse it off and let it dry.
Your vintage hardware should be as good as new.

Tips for Keeping Wood Furniture Clean
- Always use a coaster for drinks and a placemat for hot plates when using wood furniture to help protect it from water stains and spills. Be sure to wipe up any spills immediately.
- Do not leave anything wet on the wood furniture. This could warp the wood.
- Clean the wood furniture regularly by dusting it with a feather duster or taking a dry cloth and wiping it down. Regular dusting will prevent further dust and dirt buildup.
Avoid These Mistakes When Cleaning Wood Furniture
For best results, here are a few things to keep in mind when cleaning your wood furniture:
- Avoid excess moisture and water: Too much water can harm the wooden surface, causing it to warp, crack, or discolor.
- Do not use abrasive cleaners: Abrasive cleaners like Windex or bleach can damage the wood, leaving it discolored.
- Always test the cleaning product in an inconspicuous area: Try to test the cleaning agent on a small area before applying it to the surface of wood furniture. This will prevent you from causing any damage if the product is not deemed safe to use on that particular furniture.
How often should you clean wood furniture?
Wood furniture can quickly attract dust and dirt on its surface. It is a good idea to clean it by dusting it at least once a week. You can occasionally apply a furniture polisher for a deeper cleaning to give it more shine.
What is the best product to clean wood furniture?
The best product to deep clean wood furniture with is Howard Products Feed-N-Wax Wood Polish & Conditioner. This product is exceptional, and works wonder on any wood furniture. It will help enhance the natural wood’s natural beauty, making it perfect for antiques, wood tables, old dressers, dining chairs, side tables, and nightstands.

How to Clean Wood Furniture
Materials
- Murphy Oil Soap Wood Cleaner
- Howard Products Feed-N-Wax Wood Polish & Conditioner
- Microfiber Cloth or rag
- Wood Filler (optional)
- Barkeeper’s Friend (optional)
- Vaseline (optional)
Instructions
- The first step is to pour Murphy’s oil soap into a large bowl, bucket, or pot of warm water. You can also use mild dish soap if you do not have Murphy’s oil soap.Take a clean microfiber cloth or rag and dip the cloth into the cleaning solution. Wring out the excess water and begin wiping down the wooden furniture. Avoid using too much water or leaving excess water on the surface of the wood. This could leave water stains on the furniture and possibly even warp the wood. Ensure all the surfaces, including the sides, top, and inside of the drawers, get cleaned with mild soap. The soap will help remove layers of grime and dirt on the wooden piece.
- If your wood furniture has any scratches or stains, there are a few ways to attempt to remove it. Here are the techniques that you can try. • Scratches – Use wood filler to care for the deep, visible scratches on the wood furniture. This will require some light sanding and the possible application of a new finish coat.• Water Ring – If there are water rings or marks on the furniture, you can apply Vaseline or mayonnaise directly on the impacted area of the wood. Give it about an hour or so to absorb. Wipe it away with a damp cloth and continue to wipe until the stain is no longer there. • Sticky spots or Glue Residue – Try using a plastic scraper to remove stickers, sticky residue, and glue remnants on the furniture. You can also use the edge of a credit card to do this. Once you get up as much as you can, put a small amount of olive oil on a clean cloth and rub the affected area. This should help remove the remaining sticky or glue residue.
- Apply the Howard Products Feed-N-Wax Wood Polish & Conditioner liberally to the wood furniture using a dry microfiber cloth and rub it on its surface. Polishing the furniture will help to restore its original shine and luster while protecting it from damage that future spills, stains, and scratches may cause.
- Make sure you apply the furniture polish evenly, following the wood grain. Go in circular motions with the soft cloth when rubbing the polish onto the entire surface.Then let it soak in and dry. You should now have a cleaner, richer-looking wood piece of furniture.
More DIY projects you might like:
Feel free also to follow me on my social media pages – Pinterest and Instagram or subscribe to my mailing list for other design inspiration and home decor ideas.