


Add a touch of holiday charm to your home with a classic Christmas garland. A lush and inviting garland can create a festive atmosphere in your living space.
You can find various options for Christmas garlands this time of year, including pre-made artificial ones or natural choices. However, store-bought Christmas mantel garlands can be pricey. So why not try making one yourself this holiday season?
Crafting your own Christmas mantel garland is a simple and budget-friendly project that can be a fun holiday activity. And I’m going to show you just how.
Check out my easy guide on how to make a Christmas garland that uniquely combines artificial greenery with the beauty of natural greenery sourced from your backyard. Let’s get started on creating something special for the holidays.
This post may contain affiliate links, which means I will earn a small commission if you purchase through my link. Please see the full disclosure and privacy policy for more information.
How to Make a Christmas Mantel Garland
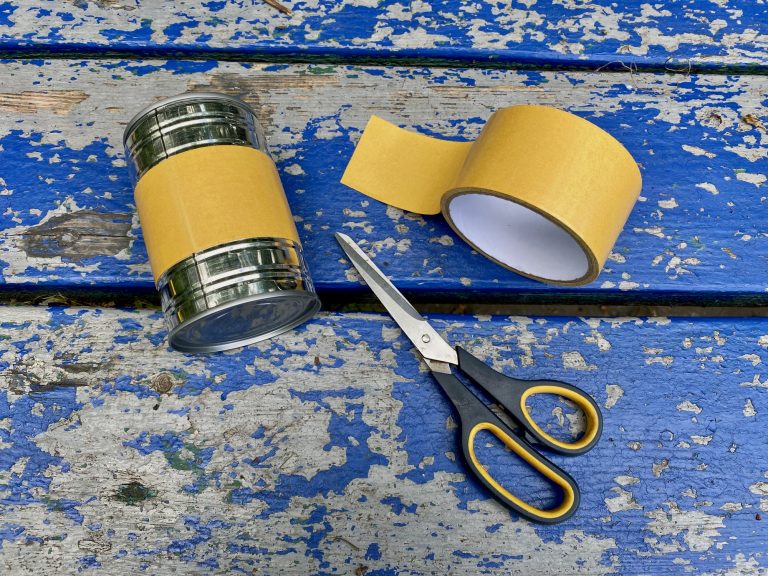
Supplies Needed
- 6-foot artificial garland – I used inexpensive plain garlands for the base dollar store.
- Floral Wire
- Greenery and foliage – I used conifer sprigs, heavenly bamboo, and eucalyptus leaves.
- Optional – Decorative floral accent pieces – I used bright-colored berries from the backyard. You can opt for holly, pine cones, ribbons, and ornaments.
- Scissors
- Command hooks
- Optional – Fairy lights or mini string lights (battery-operated)
- Optional – Ribbons

Step 1 – Measure the Mantel
Begin by measuring the width of your mantel. This measurement will be important in determining both the length of the garland and the amount needed for any overhang.
Step 2 – Gather your Greenery
During the fall or winter, wreath-like plant materials can be readily available, especially in your own backyard. You’d be surprised by what you can discover right outside your door. In my case, I found traditional evergreen branches like conifer, heavenly bamboo, and berries in my yard.
So, take a look around, do a bit of foraging in your own space, and see what natural treasures you can unearth. While foraging, aim for a variety of colors and textures to lend the garland a diverse and appealing look.
However, if foraging isn’t your thing or you prefer not to use natural greenery, that’s perfectly alright, too. You can easily find artificial greenery that remarkably mimics the real thing at stores like Target, Hobby Lobby, or Amazon. I personally used a combination of fake and fresh greenery for my own garland.
Step 3 – Create a Base
The faux garland will set the shape for the design of the garland. The more you can fluff the greenery, the fuller the entire garland will be to serve as your base for garland.
Step 4 – Cut the Greenery
Now, let’s move on to the next stage – cutting individual pieces of greenery. Make sure to vary the lengths and sizes as you cut. Don’t worry about perfection; some natural variation is fine. After cutting, gather these pieces into bundles.

Mix and match the different types of greenery to create the bundles that will be attached to the base.

Step 5 – Add Greenery to the Base
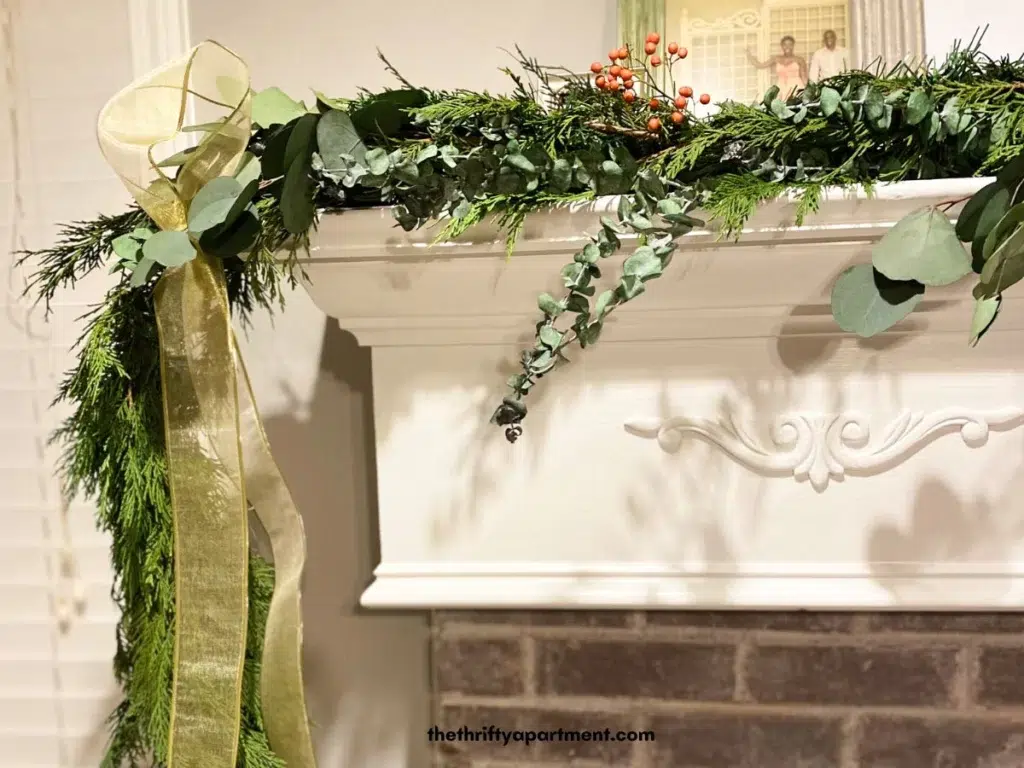
Let’s move on to adding the greenery to the garland’s base. Layer the greenery as generously as you prefer to achieve a fuller look. In my example, I used a mix of conifer, eucalyptus, and heavenly bamboo bundles. Secure the greenery bundle to the base with floral wire.
Then, overlap the next greenery bundle, laying it over the existing greenery to cover more surface area on the garland. Repeat this process with more greenery bundles until the entire garland is covered.
Step 6 – Incorporate Decorative Accent Pieces
Now comes the fun part, where you can get creative. Feel free to add any accent pieces you like to personalize your garland. Consider options like dried oranges, bells, ornaments, ribbons, bows, or pine cones.
I chose to incorporate red berries to introduce a splash of color to my garland. This part is entirely up to your taste. You can also include fairy lights or Christmas lights if you’d like to infuse some enchantment into your garland.

Step 7 – Hang the Garland on the Fireplace Mantel
Now, let’s go ahead and hang the garland. Gently place it on the mantel, ensuring it’s centered and hangs evenly on both sides.
If your mantel is narrower than mine, or if you’d like to drape the garland off the front, consider using removable command hooks. These hooks will securely hold the garland in position while safeguarding your mantel from any potential damage.

Step 8 – Inspect and Add Finishing Touch to Your Garland
Take a moment to inspect the garland and make sure it aligns with your vision. This is your chance to add those final touches. If you notice any branches sticking out, simply use some more florist wire to tuck them in neatly. You can also use scissors to trim any excess pieces that may be protruding or overly long.


And there you have it – a perfectly made, beautiful holiday garland.
Christmas Garland With Real Greenery
Materials
- 6 foot Artificial Garland I used inexpensive plain garlands for the base dollar store.
- Floral Wire
- Greenery and Foliage I used conifer sprigs, heavenly bamboo, and eucalyptus leaves.
- Decorative Floral Accent Pieces I used bright-colored berries from the backyard. You can opt for holly, pine cones, ribbons, and ornaments.
- Scissors
- Command hooks
- Fairy lights or mini string lights (battery-operated)
- Ribbons Optional
Instructions
- Measure the MantelBegin by measuring the width of your mantel. This measurement will be important in determining both the length of the garland and the amount needed for any overhang.
- Gather your GreeneryDuring the fall or winter, wreath-like plant materials can be readily available, especially in your own backyard. You’d be surprised by what you can discover right outside your door. In my case, I found traditional evergreen branches like conifer, heavenly bamboo, and berries in my yard.So, take a look around, do a bit of foraging in your own space, and see what natural treasures you can unearth. While foraging, aim for a variety of colors and textures to lend the garland a diverse and appealing look.However, if foraging isn’t your thing or you prefer not to use natural greenery, that’s perfectly alright, too. You can easily find artificial greenery that remarkably mimics the real thing at stores like Target, Hobby Lobby, or Amazon. I personally used a combination of fake and fresh greenery for my own garland.
- Create a BaseThe faux garland will set the shape for the design of the garland. The more you can fluff the greenery, the fuller the entire garland will be to serve as your base for garland.
- Cut the GreeneryNow, let’s move on to the next stage – cutting individual pieces of greenery. Make sure to vary the lengths and sizes as you cut. Don’t worry about perfection; some natural variation is fine. After cutting, gather these pieces into bundles.Mix and match the different types of greenery to create the bundles that will be attached to the base.
- Add Greenery to the BaseLet’s move on to adding the greenery to the garland’s base. Layer the greenery as generously as you prefer to achieve a fuller look. In my example, I used a mix of conifer, eucalyptus, and heavenly bamboo bundles. Secure the greenery bundle to the base with floral wire.Then, overlap the next greenery bundle, laying it over the existing greenery to cover more surface area on the garland. Repeat this process with more greenery bundles until the entire garland is covered.
- Incorporate Decorative Accent PiecesNow comes the fun part, where you can get creative. Feel free to add any accent pieces you like to personalize your garland. Consider options like dried oranges, bells, ornaments, ribbons, bows, or pine cones.I chose to incorporate red berries to introduce a splash of color to my garland. This part is entirely up to your taste. You can also include fairy lights or Christmas lights if you’d like to infuse some enchantment into your garland.
- Hang the Garland on the Fireplace MantelNow, let’s go ahead and hang the garland. Gently place it on the mantel, ensuring it’s centered and hangs evenly on both sides.If your mantel is narrower than mine, or if you’d like to drape the garland off the front, consider using removable command hooks. These hooks will securely hold the garland in position while safeguarding your mantel from any potential damage.
- Inspect and Add Finishing Touch to Your GarlandTake a moment to inspect the garland and make sure it aligns with your vision. This is your chance to add those final touches. If you notice any branches sticking out, simply use some more florist wire to tuck them in neatly. You can also use scissors to trim any excess pieces that may be protruding or overly long.And there you have it – a perfectly made, beautiful holiday garland.
How long does real garland last?
When it comes to the lifespan of your garland, if you opt for live greenery, it can stay fresh anywhere from a few days to a few weeks, extending beyond the holiday season. The duration largely hinges on indoor temperatures and the care you provide. To keep it vibrant, give your garland a light mist or a quick spritz of water every couple of days to prevent it from drying out.
On the other hand, if you choose faux greenery, it’ll last indefinitely, allowing you to reuse it year after year.
Where can I hang my Christmas Garland?
What’s great about this Christmas garland is its versatility. It’s not limited to just hanging over the mantel. You can use garlands in various other creative ways, such as:
- As a Christmas centerpiece down the center of your table.
- Draped along the handrail or banister of your staircase.
- Positioned around or above a doorway.
- Decorating the front door.
- Adding charm to the front porch.
- Serving as an accent piece on a blank wall in your living room.
- Adorning a large mirror.
- Placed above a window.
These are all fantastic options to showcase your garland’s festive beauty throughout your home.
What do you think of this DIY mantel garland? Leave a note below with your thoughts or comments about the garland.
Need more DIY project inspiration for Christmas?
Follow me on social media – Pinterest and Instagram or subscribe to my mailing list for other design inspiration and home decor ideas.
Merry Christmas and Happy New Year!
Tamara White is the creator and founder of The Thrifty Apartment, a home decor and DIY blog that focuses on affordable and budget-friendly home decorating ideas and projects. Tamara documents her home improvement journey, love of thrifting, tips for space optimization, and creating beautiful spaces.
- Tamara White
- Tamara White
- Tamara White
- Tamara White
- Tamara White
- Tamara White
- Tamara White
- Tamara White
- Tamara White
- Tamara White
- Tamara White
- Tamara White
- Tamara White
- Tamara White
- Tamara White
- Tamara White
- Tamara White
- Tamara White
- Tamara White
- Tamara White
- Tamara White
- Tamara White
- Tamara White
- Tamara White
- Tamara White
- Tamara White
- Tamara White
- Tamara White
- Tamara White
- Tamara White
- Tamara White
- Tamara White
- Tamara White
- Tamara White
- Tamara White
- Tamara White
- Tamara White
- Tamara White
- Tamara White
- Tamara White
- Tamara White
- Tamara White
- Tamara White
- Tamara White
- Tamara White
- Tamara White
- Tamara White
- Tamara White
- Tamara White
- Tamara White
- Tamara White
- Tamara White
- Tamara White
- Tamara White
- Tamara White
- Tamara White
- Tamara White
- Tamara White
- Tamara White
- Tamara White
- Tamara White
- Tamara White
- Tamara White
- Tamara White
- Tamara White
- Tamara White
- Tamara White
- Tamara White
- Tamara White
- Tamara White
- Tamara White
- Tamara White
- Tamara White
- Tamara White
- Tamara White
- Tamara White
- Tamara White
- Tamara White
- Tamara White
- Tamara White
- Tamara White
- Tamara White
- Tamara White
- Tamara White
- Tamara White
- Tamara White
- Tamara White
- Tamara White
- Tamara White
- Tamara White
- Tamara White
- Tamara White
- Tamara White
- Tamara White
- Tamara White
- Tamara White
- Tamara White
- Tamara White
- Tamara White
- Tamara White
- Tamara White
- Tamara White
- Tamara White
- Tamara White
- Tamara White
- Tamara White
- Tamara White
- Tamara White
- Tamara White
- Tamara White
- Tamara White
- Tamara White
- Tamara White
- Tamara White
- Tamara White
- Tamara White
- Tamara White
- Tamara White
- Tamara White
- Tamara White
- Tamara White
- Tamara White
- Tamara White
- Tamara White
- Tamara White
- Tamara White
- Tamara White
- Tamara White
- Tamara White
- Tamara White
- Tamara White
- Tamara White
- Tamara White
- Tamara White
- Tamara White
- Tamara White
- Tamara White
- Tamara White
- Tamara White
- Tamara White
- Tamara White
- Tamara White
- Tamara White
- Tamara White
- Tamara White
- Tamara White
- Tamara White
- Tamara White
- Tamara White
- Tamara White
- Tamara White
- Tamara White
- Tamara White
- Tamara White
- Tamara White
- Tamara White
- Tamara White
- Tamara White
- Tamara White
- Tamara White
- Tamara White
- Tamara White
- Tamara White
- Tamara White
- Tamara White
- Tamara White
- Tamara White
- Tamara White
- Tamara White
- Tamara White
- Tamara White
- Tamara White
- Tamara White
- Tamara White
- Tamara White
- Tamara White
- Tamara White
- Tamara White
- Tamara White
- Tamara White
- Tamara White
- Tamara White
- Tamara White
- Tamara White
- Tamara White
- Tamara White
- Tamara White
- Tamara White
- Tamara White
- Tamara White
- Tamara White
- Tamara White
- Tamara White
- Tamara White
- Tamara White
- Tamara White
- Tamara White
- Tamara White
- Tamara White
- Tamara White
- Tamara White
- Tamara White
- Tamara White
- Tamara White
- Tamara White
- Tamara White
- Tamara White
- Tamara White
- Tamara White
- Tamara White
- Tamara White
- Tamara White
- Tamara White
- Tamara White
- Tamara White
- Tamara White
- Tamara White
- Tamara White
- Tamara White
- Tamara White
- Tamara White
- Tamara White
- Tamara White
- Tamara White
- Tamara White
- Tamara White
- Tamara White
- Tamara White
- Tamara White
- Tamara White
- Tamara White
- Tamara White
- Tamara White
- Tamara White
- Tamara White
- Tamara White
- Tamara White
- Tamara White
- Tamara White
- Tamara White